Thursday, December 31, 2015

Thank You


This year is drawing to an end and there are many people to thank for a year full of blessings.  Mindy with you today to share a card that is suitable to send for just about any occasion you want to thank someone for.

There are many beautiful colors of metallic papers available in the Classy Cards 'n Such Online Store that would make a perfect card base. I used a blank of the Starburst Lichen Aspire Petallic Metallic Paper and die cut one of the English Rose Bouquet by Memory Box to adhere to the center of the card.  Before adhering, I colored the leaves with a marker, and the blooms with my Clear Glitter Pen by Wink of Stella. For the corners, I followed one of my fellow design team members in using one of the decorative accents from the Brick House die cut from Impression Obsession. The sentiment was from my stash.

I thank you all for visiting our blog and Web site this past year, and supporting us with all your wonderful comments and inspired creations.  I look forward to another year of Creativity in our challenges, and want to wish you all a Happy and Safe New Year in 2016.

Wednesday, December 30, 2015

Each is Different


Welcome to the weekly challenge this week at Classy Cards 'n Such. Mindy here with my collection of Snowflakes, that shows that snowflakes are like fingerprints, each one is different.

I started my card with a layer of one of the beautiful metallic papers sold in the Classy Cards Store, then a holographic print, and die cut a background of snowflakes. I removed a portion of the background die and stamped the bible verse on a square of card stock and centered it in the opening. I then cut layers of various size single snowflakes and adhered them together on top of the background for dimension.  Baby pearls were then added to the snowflake centers and to the sentiment square.

I used the following products from the Classy Cards Online Store:
Starburst Lichen Aspire Petallic Metallic Paper
Snowflake Background Die Cut- by Impression Obsession, one similar from my stash
Small Snowflake Set- by Impression Obsession
Cast All Your Cares Stamp Set- by Just Rite Stamps
Baby Pearls- white -by Want 2 Scrap and
Dries Clear Adhesive- by Art Institute

I hope you have enjoyed my card, and will consider adding a card of your own creation to our challenge this week.

Thursday, December 24, 2015

Joy to the World


The Lord has Come! We are only a day away from Christmas, and I want to take this opportunity to wish you all Joy and Happiness this holiday season.  Mindy with you to share a happy little card with a wonderful message of joy.

I started with two background layers of white that I cut a window from one, using a Spellbinders die.  I then placed it on top of the other, and traced around the opening so my sentiment would be centered.  I used the Joy to the World word stamp from the Heartfelt Creations set Joy to the World Cling Stamp set which still may be available in the Classy Cards Online store. Be sure to write Beverly if you are interested in ordering it. I ran the top layer through my embossing machine with the Dots Embossing Folder by Crafts Too!  After backing with Joy! Foam Pads- Large I adhered the layers and added it to the card front.

I framed the sentiment with another of the framed dies from the Spellbinders set, then stamped a few tiny snowflakes and added Baby Pearls- White to the center of each.  I hope each and every one of you have a wonderful holiday.

Wednesday, December 23, 2015

O' Holy Night

 Hello fellow card makers! Mindy with you to share my interpretation of the inspiration photo this week at the Classy Cards 'n Such blog weekly challenge- Silent Night, Holy Night.  When I first saw the photo, the little country church in the wild wood caught my eye.

Several weeks ago I ordered and received the Brick House die cut from Impression Obsession and pieced it as a red brick house.  I wondered if I could build a church from it this week, so I got out the die and started to construct my little country church. I also purchased the Frosted Roof and Ledges by Poppy Stamps, and it happens to fit the little Brick House perfectly.

I embossed the background of my card with the Dots Embossing Folder from Crafts Too and added my church to the front. I also added two Evergreen Trees by Impression Obsession and several stamped snowflakes and sequins.  I added a stamped sentiment on a banner to complete my card front.

I hope you have enjoyed my card, and will create a card for our weekly challenge.

Thursday, December 17, 2015

Baby, it's COLD!

 My second card for this week is celebrating the snow that many of us are enjoying earlier than normal this year.  Many of the items used on this card are available in the Classy Cards 'n Such Online Store, and there is still time to order them in case you need to create your cards this year.

Mindy here, with a card that portrays a snow globe made from a mason jar, similar to the ones I used to make when I was younger.  My Grandmother was the vegetable grower and preserver in my family, and she kept canning jars of all sizes so she would have the correct size for any of her canning needs. She would always share one with me, so that I could glue greenery branches, pine cones, tiny flowers and toys into the lid then invert the glass jar to seal it all up. I used the Dots Embossing folder by Crafts-Too and a scrap of winter paper for the background.

I then created my jar by cutting two layers with the Tall Canning Jar die by Memory Box, one from white stock and one from clear packaging material.  I cut the lid from a silver mirror card scrap, then cut Fir Trees and Small Deer  both from Impression Obsession to place inside the jar along with a few snow flake sequins.

To complete my card, I added a few sparkly flowers along with a suitable sentiment from my stash, and my card was completed.  I hope it has inspired you to create a few cards of your own this year to send for the holidays.  Sign up to receive our daily posts of inspiration from our design team members. You will be glad you did!

Wednesday, December 16, 2015

My Lucky Stars


I thank my lucky stars for you everyday! Hi friends, Mindy with you today sharing my card for the Starry, Starry Night Weekly Challenge this week at Classy Cards 'n Such.  I love making a night sky with lots of stars on my card fronts, and hope you will take the time to submit a starry card to our challenge this week.


I started my card by using Regular Embossing Paste by Dreamweaver to emboss through my Stars, Starry Nights stencil by Memory Box.  After the paste was dry, I die cut the Santa die cut set from Impression Obsession and adhered it using Double sided adhesive SCOR-TAPE to the back of my paper before die cutting.  After the die went through the machine, all I had to do was peel the design from the stock and all the little details including the antlers and legs were ready to paste down.

For the bottom of my card, I formed two snow banks to overlap on the base, then adhered several Evergreen Trees die cuts from Impression Obsession to layer with Scor-tape and Joy! Foam Pads- Small to give depth and dimension.  To complete my card, I added a few star shaped sequins and an applicable sentiment.

I hope you have enjoyed my card, thank you for visiting today.

Thursday, December 10, 2015

Our Home

 Happy Holidays Everyone!  Mindy with you today sharing a card that could be used for the holidays, bringing wishes and love from our home to yours during this festive season. 

I started with a background that I cut from the Blueprints 13 Die-namics from My Favorite Things then ran through my Cuttlebug with the Dots Embossing Folder from Crafts Too. I then started "building" my home with the New Brick House die cut from Impression Obsession.  All of the elements from one pass of the die were used on this card, including one extra window.  I also cut a strip of the Grass Border from Impression Obsession to ground the house to the card.  The extra decorative bead board was used as a corner element and a baby pearl was used to accent it.

To complete my card, I cut a banner strip and stamped a home themed sentiment to place on the front of the card, and cut the Merry Christmas die, also from Impression Obsession to place on the inside of the card. Happy Holidays to One and all, from me to you!

Wednesday, December 9, 2015

Angel Wishes

Hello friends, Mindy here with my weekly card for the Classy Cards 'n Such Weekly Challenge
# 114- Angels. After studying the inspirational photo, I decided to create a shaker card using my Angel die as the focal point.

I stamped the card background with a snowflake stamp from my stash in Spun Sugar Distressed Ink from Tim Holtz, then began building my shaker element.  I used the Square Claudette Frame by Poppy Stamps to cut one from white and one from a pastel print.  The pastel print was adhered to the card front, and the white frame was used for the shaker element. I enclosed my sequins cut from the Sequins Die-Namics from My Favorite Things in two layers of clear cellophane packaging from a recent die purchase. I used 1/4" Scor-Tape to close the package and adhere it to the Claudette Frame.
Joy! Foam Pads - Small were used to then adhere my shaker element to the card front.

I also cut two corners from a third Claudette Frame that didn't cut completely, and used those to add points to the top and bottom of my square shaker. I also cut a Bamboo Shoots die from Memory Box to add between the shaker and card base for texture. My focal image, the Angel Die from Impression Obsession is no longer available from the Classy Cards Online Store, but there is a beautiful one from Sue Wilson- 2015 Christmas Angel- Festive Collection available that would work just as well.

To complete my card, I cut a banner and added a sentiment, then added Baby Pearls- White around the frame.  I hope you have enjoyed my card, and find it inspiring when making your own cards.

Thursday, December 3, 2015

Pine Branch

My card represents a snowy white branch with berries, that could be a pine branch covered with white fluffy snow.  Mindy with you, to share my card that could be used for Christmas or any winter holiday or occasion.
 I built two frames from the Radiant Rectangles Die by Spellbinders, and attached my Branch Set 1
and Ponderosa Pine Sprig both from Dee's Distinctively Dies.  For berries on my branch, I punched red dots from a regular hole punch, and glittered them with Clear Glitter Pen from Wink of Stella . I tucked them in amid the pine sprigs and added a Christmas sentiment to complete my card.

I hope you have a wonderful week, and enjoy the many sample cards our design team shares on our blog.

Wednesday, December 2, 2015

Merry and Bright

Happy Holidays one and all! Mindy with you to share a card for our weekly challenge at Classy Cards 'n Such.  This week's challenge is O' Christmas Tree, create a card with a white tree with blue, and a touch of silver or kraft.
 I started my card with a rectangle of blue stock cut from the Blueprints Thirteen die from My Favorite Things. I then layered some white card for the hills and die cut three trees from the Fir Trees die from Impression Obsession.  Two frames from the Rectangles 6-in-1 Frame, also from Impression Obsession were added with foam tape, along with several decorative ornaments laying on my worktable.  A Christmas sentiment was added along with sparkle from my Clear Glitter Pen by Wink of Stella.

I hope you have enjoyed my card, and will create one of your own to enter in our weekly challenge.

Thursday, November 26, 2015

Holiday Joy

 Happy Thanksgiving, friends. Christmas is just around the corner, and whether you celebrate with traditional colors or bright colors, your decorations and cards can show your color preferences during this time of joy.  Mindy here to share a card using bright colors and pastels to brighten your holidays.

My card design began with a piece of favorite printed paper adhered to my card base.  I then stamped the Sparkling Poinsettia Candle Cling Stamp Set from Heartfelt Creations on watercolor paper and colored it with watercolor markers. I fussy cut around the design, and used Joy! Foam Pads- Large to raise it from the card surface.  My sentiment was then die cut from a Sue Wilson die, then adhered to the Elegant Musical Staff by Memory Box.  I added a single rhinestone, from the Sleek Silver Rhinestone Strips to add just a tiny bit of sparkle to my card.

I hope you have enjoyed my card, and will join us daily for our card inspiration.

Wednesday, November 25, 2015

Celebrate the Season

Thank you for joining us for our weekly card challenge #112-design a card with Ornaments.  Mindy with you sharing my card celebrating the season with ornaments.


I started with a dark blue card base, and attached an off white panel die cut with the Distressed Addington Collage die by Memory Box.  I then added my ornaments, cut using the Classic Ornament die also from Memory Box and a musical print paper.  Joy! Foam Pads- Large were used to pop up the ornaments, and the sentiment block with the sentiment from the Keep in Touch, Too stamp set by
Sweet 'n Sassy stamps.  A tiny adornment from my stash was added to each ornament to add a bit of bling to each ornament.

I hope you have a wonderful day full of happiness and joy.  Be sure to visit us daily to see all the wonderful cards our design team creates for you.

Thursday, November 19, 2015

Thankful and Happy


  Mindy with you this afternoon with a card that asks a special question, Is it Happiness that makes us thankful or is it Thankfulness that makes us happy? Something for you to ponder this day.

I started with a panel colored with the Ken Oliver Crafts ColorBursts from the brights set.  I usually color full 9" X 12" pages of watercolor paper when I play with the Color Bursts and then trim them down to card size so I will have them ready when I need a bright and beautiful background.  I then stamped my sentiment from the I am Thankful stamp set from Impression Obsession and die cut around it with the Labels Eighteen die set from Spellbinders.

I then stamped and added the Birds and Blooms stamp set by Heartfelt Creations.  After coloring and fussy cutting around the flowers I mounted them with Joy! Foam Pads Large to achieve the needed dimension for the front of my card.  I then added Allure Swirls in Silver Rhinestones for the center of the tiny flowers to add just that touch of bling.

I hope you have enjoyed this card, and will give the Color Bursts by Ken Oliver Crafts a try. They are so vibrant and fun to color your backgrounds.

Wednesday, November 18, 2015

Grateful


Good morning friends. Mindy joining you today with a sample card for our weekly challenge at Classy Cards 'n Such.  Our challenge this week is Thankful, a sentiment that is heartfelt all year long, but especially at this time of year.

I started with the greeting,  Grateful, from the I am Thankful stamp set from Impression Obsession. I knew I wanted this to be my focal image on my card so I die cut around it and inked the edges to match the base card and printed paper from the Romance paper pad by Joy! Crafts.  I also die cut the Mary Border Strip by Spellbinders to back my focal strip.

I then added another sentiment from the I am Thankful stamp set and a flower from the  Arianna Blooms PreCut set was stamped on white stock and then colored to match.  I am so grateful for good health and happiness this Thanksgiving, and I hope you are too!

Thursday, November 12, 2015

Holly Greetings

While busy in my studio creating Christmas cards, I decided to try out a few new dies I ordered from the Classy Cards 'n Such Online Store. Mindy here with you to share one of the New Holly dies I recently received.

 The Holly Flourish by Memory Box was cut from dark green stock. The larger holly leaves cut an outline and the inner portion of the leaf could be added back in like a puzzle piece.  After adhering the die to the card front with Art Institute Dries Clear Adhesive  with the micro tip, I lifted the holly leaf outline to give the card some dimension.  I also used a Cheery Lynn Designs tiny flower die to cut tiny white flowers that I adhered to the flower shapes on the holly die to add yet more dimension.

I added a sentiment from Elizabeth Crafts Designs from my stash, and then decorated the background with some shadow stamping and tiny dots in red. To complete my card, I adhered some of the Allure Swirls in White Pearls to the stamping to give the card even more dimension.

I thank you for stopping by and viewing my card, and hope you will share a card or two with our challenge this week.

Wednesday, November 11, 2015

Snowy Mittens

Thank you for joining us at Classy Cards 'n Such for our idea samples for this week's challenge,
Mittens or Stockings. We were instructed to use the colors red, and white, with a touch of green.
Mindy here, to share a snowy card that makes me chilly just looking at it.
 My card started with a bright white watercolor card base that I used an edge border, Agatha Edges by Elizabeth Crafts Designs to die cut the top edge of the base card.  Then using the stitched rectangle and fishtail banner tag from the Blueprints thirteen Die-namics by My Favorite Things, I die cut a red rectangle and white/gold fishtail banner for the front of my card.

I just fell in love with the Stacked Mittens die from PoppyStamps, so I cut it from red stock and the Small Snowflake Set from Impression Obsession was cut from white stock.  I layered my snowflakes and added a touch of glitter for falling snow, before adding a sentiment to complete the card.

I hope you will join our challenge this week and create a few more Christmas cards for your stash. We love seeing what you create!

Thursday, November 5, 2015

Humdinger


Mindy with you today with a hummer of a card, featuring a beautiful hummingbird stamp from the Classy Cards 'n Such Online Store.  Hummingbird by Stacy Stamps is a gorgeous stamp that can be colored in so many different ways with many media.  I used watercolor markers on watercolor paper so I could shade and blend my colors.

I then used the Labels Eighteen die by Spellbinders to cut around the image then mounted it on a scrap of water colored paper before cutting again. This image was then adhered with Joy! Foam Pads- Large on top of my card front covered with a scrap of scrapbook paper. I also added the sentiment from the God's Purpose stamp set from Sweet 'n Sassy Stamps, along with a ribbon bow and a few of the Dew Drops- Water from The Robin's Nest for texture and dimension.

Please look for our additional inspirational cards near the end of the week, our design team members do a wonderful job sharing their creations each week.

Wednesday, November 4, 2015

Thankful

Welcome friends, Mindy here with my sample card for this weeks card challenge at Classy Cards 'n Such.  This week's theme is Gobble-Gobble, because Thanksgiving is just around the corner.  There are many things I am thankful for, especially the many followers of our blog and newsletter.

I started today's card with an embossing folder that is NEW in the Classy Cards store. It is the Braided Vines embossing folder by Sue Wilson and is one of the larger sized folders, 8.5" X 12"
The only problem I had was my machine is one of the smaller models and the folder was too big to fit.  I am planning to get a new machine soon with the larger plate, so I decided to use the folder in a different way. I opened it and applied my ink on the raised side, then stamped the image on my background stock.  I then inked around the edge before adhering to my card base.

I then die cut a stitched oval and used Joy! Foam pads- Small to adhere it to my card.  I then cut two Classic Tom Turkeys from Memory Box and a handful of leaves from the Small Leaf Set by Impression Obsession.  I colored the small leaves with many colors from the Complete set of Earth Tone Color Bursts from Ken Oliver Crafts on watercolor paper, then adhered them with Art Institute Dries Clear Adhesive.

The sentiment used was from the I am Thankful stamp set from Impression Obsession, and I added a few hand-cut sequins from the Sequins Die-Namics die from My Favorite Things. I hope you have enjoyed my card, and will join us for our challenge this week.

Thursday, October 29, 2015

Seeds of Today

I love sunflower seeds, along with all the birds and squirrels in my yard. Mindy here, with a card that is bright and sunny, and corresponds with our challenge this week at Classy Cards 'n Such blog.

I tried a fun technique I saw demonstrated on YouTube, where you can use an edging die over and over to make an interesting and different background for your card background.  I then stamped the Sunflower Stem PreCut Set from Heartfelt Creations on white stock, colored and shaded it with various Copic markers, then fussy cut around the flower and several of the sunflower seeds for my focal image.

To give the card a little more texture, I added a length of Ivory cotton Cluny Lace across the bottom of the card and then using Joy! Foam Pads- Large attached the flower, along with the sentiment from the set, and a tiny squirrel from the Squirrel Set by Impression Obsession.  To finish my card, I added a little bling with Silver Rock Candy from Queen and Company for dimension.

Have a wonderful week, and be sure to join us for our weekly card challenge.  It is so much fun, and you could win a wonderful prize if your card is selected.

Wednesday, October 28, 2015

Share the Wealth

Welcome friends to this weeks sample for Classy Cards 'n Such Weekly Challenge, #108 Squirrel-y Friends.  Make a Friend card~ and add a squirrel or bird. Mindy with you today, and I added some of each, even though my focal image is a beautiful Cardinal.
My focal image is from the stamp called Cheery Cardinal PreCut Set from Heartfelt Creations.  I stamped it on off-white stock, colored with various markers, then fussy cut before adding it to a background of printed paper, metallic stock mat, and kraft card base. I used Joy! Foam Pads-Large to attach it to the card before adding the sentiment from the same set, and two small squirrels from the  Squirrel Set by Impression Obsession.

To finish my card, I added a few Cherry Chocolate Dew Drops by the Robins Nest, just to add a bit of dimension. I hope you have enjoyed my card, and will join us for our challenge this week.

Thursday, October 22, 2015

Hope and Love

October is Breast Cancer Awareness Month and our color theme this week for our weekly card challenge at Classy Cards 'n Such is Pretty Pink Christmas.  I decided to use the colors I had out on my worktable already to create a pretty pink card for my friends who have, and have fought against this terrible disease.

Mindy here with a pink ribbon card that has a delicate background with just a few embellishments, not to distract from the pink ribbon of Hope.  I started with a sheet of Pearlized Esse White Metallic card stock and die cut two passes of the Distressed Addington Collage by Memory Box, and two side passes of the Juliet Damask Embossing Border from Anna Griffin.

I then found some bits and pieces on my worktable, when arranged together made up my focal image and sentiment banner on my card front. To finish my card, I added three Poinsettia Dew Drops in pink, using my favorite white glue, Art Institute Dries Clear Adhesive to adhere them.

I hope you have a nice week, and will check back again for more wonderful card ideas from our terrific design team.

Wednesday, October 21, 2015

Pretty in Pink


Hello Classy Cards friends! Mindy here with a Pretty in Pink gift stack to celebrate our Pretty Pink Christmas Challenge at Classy Cards 'n Such. I used shades of pink, white, a touch of green, and a touch of black on my card this week, and I hope it inspires you to create a card of your own for our weekly challenge.

I started with two of the beautiful metallic colored card stocks available in the Classy Cards online store.  Pearlized Esse White Metallic, and Stardream Rose Quartz Metallic stock, and die cut my frame and Small Deer die cuts from Impression Obsession from the white. I also used the white for my card base. I embossed a background panel from the Rose Quartz with the Garden Flowers embossing folder from Crafts Too!

I then stamped my Flower Gift Boxes by Impression Obsession and used different markers in pink, white, green, and black to color the stack for my focal image. I then arranged my images in a pleasing form and used Joy! Foam Pads- Small to attach the images and holiday sentiment to my card front.

I hope you have been inspired to create a card for our challenge this week. We love seeing your creations.

Thursday, October 15, 2015

You Are Special

Good afternoon, friends.  Mindy here with a CAS card that is quick and easy to make. If you have seen some of my previous cards, you may have noticed that I love flowers and birds. I found this stamp set in the Classy Cards 'n Such online store called Gods Purpose by Sweet 'n Sassy stamps.
The little Chickadee is so sweet and is sitting on a branch of bittersweet.

I stamped the image and cut around it with the Spellbinders Labels Eighteen, and backed it with a sheet of dark maroon card stock.  I then cut the frames from Impression Obsession Rectangles 6-in-1 Frame set and Echo Bronze Stardream Metallic card stock.  One of the sayings from the Gods Purpose stamp set was stamped on a tiny tag and mounted with Joy! Foam Pads -Large to complete my card.

You still have time to submit a card for our weekly card challenge on the blog. Have fun, and join us every week for a great prize or Top 3 badge.

Wednesday, October 14, 2015

Plant Fall Color

Good morning, and thanks for joining us for the Classy Cards 'n Such Challenge this week, titled Colors of Fall! Mindy with you, sharing my inspiration for planting fall color in your garden.

 I knew I wanted to look as if I were planting a wheelbarrow full of fall flowers, so I started with a sheet of watercolor paper and using three colors of my Ken Oliver Crafts Color Bursts, Yellow Ochre, Burnt Orange, and Merlot sprinkled and poofed color and then sprayed with water. After the colors blended and dried, I die cut the Floral Vine die by Anna Griffin and cut it into smaller pieces.


Then from Impression Obsession I die cut the Wheelbarrow and filled it with the Floral Vine. I also added a few Small Hydrangea Blooms by Poppy Stamps to give more dimension. I cut the Spellbinders Decorative Labels Twenty- Seven from the beautiful metallic Echo Bronze Stardream Metallic paper sold in the Classy Cards Online Store, and mounted it on my card front with foam tape.

I hand printed a label for the grouping, Plant Fall Color, and attached it to the top of the label.  I hope you are inspired to create a card for this weeks challenge. We love seeing what you create!

Thursday, October 8, 2015

Prince of Peace

Hello card makers out there. Mindy with you today to share a wonderful card that I will be making for the holidays this year. It is a Clean and Simple card that is one stamped image, then can be decorated as little or as much as you desire.

I stamped the Joy to the World Cling Stamp Set from Heartfelt Creations on watercolor paper, and added just a bit of color with my watercolor markers.  I distressed around the edge of the paper with Vintage Photo Distressed Ink and my Mini Ink Blending Tool by Ranger to give it the distressed edge look, then matted it with a piece of So. . . Silk Glamour Green before adding to my card base of Bluebell Stardream Metallic paper, both carried in the Classy Cards 'n Such Online Store.

A tiny satin bow and several paper sequins cut from the Sequins Die-Namics die from My Favorite Things were added to complete my card. Thanks for stopping by today, you still have time to join our weekly card challenge "Holly-days" where you can submit a card and possibly win a wonderful prize.

Wednesday, October 7, 2015

Comfort and Joy

Hello, friends, Mindy with you this afternoon with our challenge sample card for this week's challenge "Holly-days" add holly and/or poinsettias to your card.  I love poinsettias, especially making the dimensional ones from paper.

There is a really exquisite stamp set in the Classy Cards 'n Such Online Store from Heartfelt Creations called Sparkling Poinsettia Candle, that has three small poinsettias at the base of the candle. I stamped the stamp on watercolor paper and colored the entire image with watercolor and then glittered the melted wax portion with glitter. Then using the Layered Poinsettia Flower from Spellbinders, die cut the smaller petals enough for three flowers. On my Paper Blossoms Molding Mat using my Paper Blossom Tool Kit I shaped and molded, then adhered the layers of petals and centers to create the dimensional flowers that will be attached to the stamped image.


To create the card background I die cut the A2 Filigree Delight from Spellbinders in a kraft colored stock, then topped it with an oval cut from off white stock using the oval die from the same Filigree die set. I then fussy cut the candle image and glued it to the oval base using my favorite white glue, Art Institute Dries Clear Adhesive. The sentiment that comes with the candle stamp was used to complete the card design.

I hope you have enjoyed my card, and will join our card challenge this week.

Thursday, October 1, 2015

Fall is Here!


Fall is here, and I hope the weather will be cooling soon, and the leaves on the trees will be changing colors.  Mindy with you, celebrating fall today with a colorful card featuring these leaves that will soon color the land and skies.

I aged the edges of the card base with some Antique Linen Distressed Stain, and die cut two Open Scroll Leaf die from Impression Obsession, along with the Foliage leaf die from Spellbinders.  For the Spellbinders leaves I mixed several colors of the Ken Oliver Color Burst, Burnt OrangeOrange, and Yellow Ochre, on a scrap of watercolor paper before cutting the leaves. After arranging the elements in a pleasing design, I added a sentiment from the I am Thankful stamp set from Impression Obsession.

There is still time to join our weekly challenge on the blog.  Join us and be eligible to win a wonderful prize from Classy Cards 'n Such.

Wednesday, September 30, 2015

Power of Pumpkins

Good afternoon, friends.  Mindy with you today to share my card for this week's inspiration challenge on our blog, titled Feeling Fall-ish!  My card, for the Power of Pumpkins is inspired by the beautiful white pumpkins in the photo.  There are so many wonderful pumpkin flavored food and drinks available now that fall is here.  (I think my favorites are the pumpkin coffee's and the pumpkin ice creams.)

To start my harvest card, I took a piece of the Echo-Bronze Stardream Metallic paper from the Classy Cards 'n Such online store, and using the Distressed Addington Collage die by Memory Box cut two panels out of the bronze stock. I popped this panel up on the card base with two layers of Joy! Foam Pads- Large to give the card lots of dimension.

I then cut six oval shapes with a classic oval die in two sizes for my pumpkins, along with one Open Scroll Leaf die from Impression Obsession. The pumpkins were highlighted with a little Wink of Stella Glitter and grounded with a strip of the Woodland Border by Poppy Stamps.

To complete my card, I  stamped the sentiment from the I Am Thankful stamp set from Impression Obsession, die cut with an decorative oval die, and then highlighted with the glitter pen.  Thank you for joining me today, and I hope you will join in our challenge this week.

Thursday, September 24, 2015

Behold the Birds


Good afternoon, Mindy with you sharing a card that could be used for several occasions, including Thinking of You, Happy Birthday, or Get Well Soon.

The many layers of this card are from products sold in the Classy Cards 'n Such Online Store.  I started with one of the beautiful metallic card stocks, Bluebell Stardream Metallic, and added a layer of Romance from the 6X6 paper pad from Joy! Crafts.  I then found a strip of one of the Watercolored Memories 6 X 6 pad pages from Ken Oliver Crafts, and added that layer on top of the Romance paper.

For my focal image, I stamped the bird stamp from the Peace of God stamp set from Sweet 'n Sassy Stamps on watercolor paper and colored it with markers and Ultramarine Blue Color Burst by Ken Oliver Crafts.  I fussy cut around the image and used Joy! Foam Pads- Large to attach the image and saying from the Peace of God Stamp Set.

Thank you for stopping by, and I hope you will create a card for our challenge this week.

Wednesday, September 23, 2015

My Family to Yours


Hello, friends. Mindy with you today bringing you a card that wishes well from my family to yours. The theme of our Card Challenge this week is Deer Season, and the inspiration photo shows a way to feature deer this season.

I was inspired by the plaid design shown on the sample, along with the wonderful deer.  I started my card with a very fine scroll print mounted on a kraft colored card base. I then die cut a rectangle of plaid card stock with the Romantic Rectangles die by Spellbinders, and used Joy! Foam Pads- Large to adhere it to the front panel for dimension.

I then colored a piece of watercolor paper with Ultramarine Blue and Pthalo Green Color Bursts by Ken Oliver Crafts. I then used a circle die from my stash to cut a circle for my main images.  I then arranged the Evergreen trees and Small Deer die cuts from Impression Obsession on the circle for my focal image.  I also added the sentiment from a Sweet 'n Sassy stamp set to complete my card.

Thursday, September 17, 2015

Let Love Grow


It's Thursday afternoon, and Mindy is back with you, sharing a card I made that can be used for a Thinking of You, or a birthday card. I am so excited to be using a new die set, Distressed Addington Collage Set by Memory Box.  There are several styles in each set that can be used in many different ways to create beautiful die cut images.

To begin my card, I used a sheet of watercolor paper, and colored it with the Indigo, and Terre Verte Color Burst by Ken Oliver Crafts, for my background. I then added the die cut background on top, using Joy! Foam Pads- Small to adhere the image above the watercolor paper.

I then stamped the floral image from Hope and Love Vintage Labels Eight and Nine from JustRite Stamps to some white card stock, along with die cutting a set of leaves from the Open Scroll Leaf die from Impression Obsession.  The die and stamped image were adhered to the front panel, along with adding a few Water Dew Drops from the Robins Nest for accent.

I hope you are enjoying our samples this week. We love seeing what you create, too. Please join in our Weekly Card Challenges for a chance to win a wonderful prize.

Wednesday, September 16, 2015

Get Well Soon


Good morning friends, Mindy here with this weeks card inspiration from Classy Cards 'n Such.  Our theme this week is An Apple A Day, with the inspiration photo of apple shaped decorated cookies, with interesting colors and patterns to inspire you. You may add an apple if you wish!

My card begins with an embossed background using my Scor-Buddy Mini scoring Pad. I embossed diagonal lines every half inch and then turned my background 90 degrees and scored diagonal lines back the other direction. The lines were highlighted and pearl dots were added here and there to follow the design.

I then cut a panel using the New Distressed Addington Collage by Memory Box. These new dies are so interesting and can be used in many decorative ways.  I colored the edges with Spun Sugar and Picked Raspberry Distressed Ink and my Mini Ink Blending Tool by Ranger.  I then punched several apple shapes and apple blossom flowers, colored them with watercolors and adhered them to the panel. The entire panel was popped up with Joy! Foam Pads- Small.

The sentiment from the Keep in Touch, Too stamp set by Sweet 'n Sassy Stamps was stamped on a label from the  Labels Eighteen, die set by Spellbinders.  A few Poinsettia Dew Drops by the Robins Nest were added for accent to complete my card.  Thanks for visiting with me today.

Thursday, September 10, 2015

Autumn Leaves


I love Autumn and Fall, Mindy here with a fresh fall card filled with lots of colorful leaves. This week our card challenge theme was Autumn Weddings, so as I was searching for more inspiration on Pintrest, I saw so many beautiful photos of fall and autumn leaves.
I just received a background stamp of Autumn Swirls by JustRite Stampers, so I took my Mini Distress Pads by Ranger and stamped many colors, yellow, orange, and brown on the back of the stamp before stamping on my background.  I also used my Earth Tones Color Burst Assortment by Ken Oliver to make a fall-ish watercolor base to die cut my Foliage Die of leaves from Spellbinders from.  I used my Bitty Blossoms die also by Spellbinders to cut the large rose flower and arrange the leaves and flower on my stamped card background.

I stamped my banner with a sentiment applicable to the design on my card, and mounted to the card base with Joy! Foam Pads-Large and my autumn card was complete.  Thank you for joining me today in sharing this card.

Wednesday, September 9, 2015

Autumn Dreams


Autumn and Fall are just around the corner, the leaves are changing and the temperatures are cooling. Mindy here, with an inspirational card taken from the photos on our Challenge Calendar #101 Autumn Weddings.

I just received the Earth Colors from Ken Oliver Crafts, available now in the Classy Cards 'n Such Online Store. I just love playing with all the wonderful colors, so I started combining colors that seemed like fall to me.  I combined SepiaTerre Verte, and Indigo on my watercolor paper for my background. While it was drying, I die cut the Madison Park Bench by Poppystamps. along with the Bushel of ApplesSmall Leaf Set, and Roses from the Wedding Cake die sets all from Impression Obsession. I used the small die cuts to form two small bouquets, tied to the park bench.

I also die cut the Pennant Swag, twice and decorated with the tiny apples from IO.  The banner was adhered with Joy! Foam Pads- Large and decorated with tiny pearls in the center of the bows.

Thursday, September 3, 2015

A Special Gift


A special gift~ from me to you!  Good afternoon friends, Mindy here to share another special card great for parties of any kind.  I had some of my Spritz and Sprinkle background left over from my challenge card this week, and thought I would use it on another party card for our 100th challenge.

The background was made on watercolor paper, with the Spritz and Sprinkle technique using Ken Oliver's Color Bursts. These are a very vivid pigmented color powder that we now sell all twelve colors of in the Classy Cards 'n Such Online Store.  I used Alizarin CrimsonMerlot, and Yellow Ochre to spritz and sprinkle on the paper after I laid down my Mini Ring Doily plastic stencil from the Crafters Workshop.  I then misted with water and lifted the plastic stencil to view the white outline made from the stencil protecting the paper from the pigmented ink.

While the background was drying, I die cut the Rose Doily #4 from Prima from white card stock and adhered it to the background with Art Institute Dries Clear Adhesive with metal applicator tip.  I then stamped the Flower Gift Boxes stamp from Impression Obsession, and colored it in with fine tipped markers.  I fussy cut around the box stack and adhered it to the background with Joy! Foam Pads- Large to give it depth and dimension. I added a banner with a sentiment from Keep in Touch, Too stamp set from Sweet 'n Sassy Stamps, and a few assorted pearls to finish my card.

Wednesday, September 2, 2015

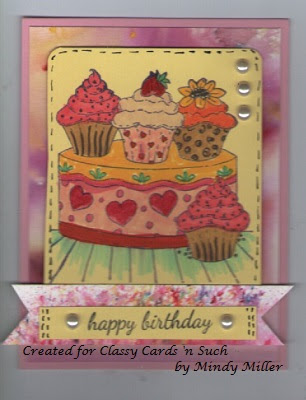
Cupcake Celebration


Let's Party! It's our #100 Weekly Challenge at Classy Cards 'n Such, and our theme this week is Bright and Festive- make a card that is party oriented using our Photo Inspiration.  Mindy here, sharing my card that is beautifully colored cupcakes that are great for any party!

I started with my favorite colors of Ken Oliver's Color Bursts, Alizarin CrimsonMerlot, and Yellow Ochre, and spritz and sprinkled them on watercolor paper. After adding water, I let the background dry while I stamped and colored my Cupcakes image from Impression Obsession. I love coloring this image because you can use almost any marker to color the cupcakes. It always comes out bright and festive.


After trimming my stamped image and rounding the corners, I added a line of black ink for stitching lines and adhered it to the watercolor background.  I then stamped the greeting, Happy Birthday, from the Keep in Touch, Too stamp set from Sweet 'n Sassy Stamps. I backed it with a scrap from the watercolor paper, and then added some multi-sized White Pearls from Want2Scrap.

I hope you have enjoyed my card, and will join us for our Celebration Challenge this week on our blog.

Thursday, August 27, 2015

Sunrise & Sunset


Hello friends, Mindy with you, sharing a friendship card using pieces of watercolor paper decorated with Ken Oliver Crafts Color Bursts as my main focal image.  I love playing with the Color Bursts, and the next set of Color Bursts - Earth Tones Assortment are now in at Classy Cards 'n Such online store. They are available as singles or as a 6 pack of the colors.

I trimmed down a piece of my watercolor art to fit my card front, matted with white on a red card stock base.  From there, I added a scrap of gold embossed kraft stock, and added a bit of Ivory cotton teardrop cluny lace trim around the kraft stock.

To complete my card, I added a butterfly stamped from the Sunflower Stem PreCut Set from Heartfelt Creations decorated with tiny Baby Pearls- White. My sentiment is from Hope and Love Vintage Label set from JustRite Stamps and is trimmed and attached with Joy! Foam Pads- Large to give dimension.

Thank you for joining me today!

Wednesday, August 26, 2015

School Butterflies

When I read about this week's challenge at Classy Cards 'n Such, Back to School- use the colors in the inspiration photo, and add something related to school, I had to laugh.  Mindy here, and every year on the first day of school I always had butterflies in my stomach. So my card this week is a pun on my First Day Jitters.

I started my card with a rectangle base that I ran through my die cutting machine with an embossing folder that embossed music on the card. I then backed it with a frame of red card stock before adhering it to my kraft colored card base.  I then die cut the New, English Rose Bouquet die from Memory Box along with the Elegant Musical Staff also from Memory Box. I adhered the roses and music staff with Art Institute Dries Clear Adhesive to the embossed panel then adhered some of the mini butterflies from the Butterfly Delights die cut using some of the Textured Pattern Foil Paper sold in the Classy Cards 'n Such Online store.

My sentiment banner of a pencil was hand drawn and lettered with the phrase, "let the music move you!" and was adhered with Joy! Foam Pads- Large.

I hope you have been inspired to create a card for our Back To School challenge this week. We love seeing what you create!