Thursday, January 28, 2016

Love You, Sweet Pea

Hi friends, Mindy with you today sharing a Valentine's Day themed card using one of the NEW Stacy Stamps floral images available in the Classy Cards 'n Such Online Store, as my focal point and several leftovers from previous cards as accents.


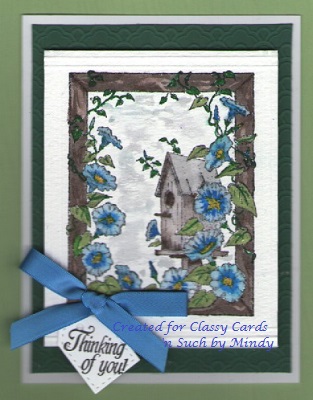
I started with the Ornate Frame Embossing Folder by Darice as my background. I then stamped the Sweet Pea stamp from Stacy Stamps on white card stock and colored it with watercolor markers before adhering it with foam tape to give dimension to the front of my card. I then added a banner stamped with a Valentine message from my stash, and decorated the card front with the inside remaining hearts from my Heart of Hearts die from Impression Obsession that I used on my previous challenge card. I also added a few sequins here and there to give the card a little sparkle.

I usually save my negative images from the die-cuts to use in future cards. I love to use, reuse, and recycle various embellishments and use them in my card making when I can. Have a wonderful day, and be sure to check the Classy Cards 'n Such Online Store for special prices available this week.

Wednesday, January 27, 2016

Vintage Valentine

Good Morning, friends. Our challenge this week at Classy Cards 'n Such is using Neutrals for your card or project.  Neutral or natural colors are usually considered earth-tone colors. Using this monotone color palette is so much fun, and really makes for a classy looking card. I hope you enjoy this beautiful card suitable for weddings, birthday's and even Valentine's Day!


 I think my card looks vintage with the white and off white shades of card stock I used for the layers and dies. I used four different heart-shaped dies for the Valentine theme of my card.

I used:
Heart Flourish by Impression Obsession,
Heart of Hearts  by Impression Obsession,
Conversation Heart Block by Impression Obsession, and
Love You Heart by Impression Obsession.

Using the darker beige card stock I cut the Heart of Hearts die, and let the light beige stock of my card base show through.  All of the little innies pieces were saved for additional add-ons later.  I then cut the Heart Flourish and Love You Heart dies and adhered them over the top of the background to cover the front of the card.  I used my favorite clear glue, Art Institute Dries Clear Adhesive, to adhere the many layers of die-cuts and tiny heart shapes, then added foam tape to the background stock to give the card dimension. A heart shaped pearl button was attached to the center of the Heart Flourish to finish the card.

I hope you have enjoyed this card.  It shows that with just a few dies, a few different shades of card stock, and an embellishment or two, you can make a classy card look elegant and festive.

Thursday, January 21, 2016

Morning Glory

Welcome friends, Mindy with you sharing a watercolor card using one of the New Framed Flowers stamps by Stacy Stamps.


I stamped the image Morning Glory by Stacy Stamps on watercolor paper and colored the image with some Copic and some watercolor markers.  I then embossed accent lines around the image with my Scor-Buddy scoring tool and bone folder, accenting the edges of my watercolor paper. I then adhered a background paper embossed with the Mini Fans Embossing Folder by Crafts Too to my card base, then my Morning Glory image as the top layer.  A single layer bow and tag with sentiment from God's Purpose Stamp Set by Sweet 'n Sassy Stamps completed the card.

I love these little watercolor images, they make great accents for classy cards and there are several to choose from.  Have a great week, and create a card to join in our weekly challenge.

Wednesday, January 20, 2016

Button Bouquet


Button, button. . . . Whose got the button? We do!  The theme for this weeks challenge at Classy Cards 'n Such is Buttons, all shapes and colors.  Mindy here, and when I saw this weeks inspiration photo on the calendar page, I wanted to make a flower arrangement from buttons.

I started by assembling several layers and colors of buttons suitable for my card. I die cut the Lattice background from card stock and one from craft foam, to build it up and give the card dimension. I embossed a background card with the Mini Fans Embossing Folder by Craft's Too and adhered the lattice oval to the background with Art Institute Dries Clear Adhesive. I then die-cut the Bamboo Shoots die and adhered it before adding my button flowers to the arrangement.  Two Medium Butterflies from Impression Obsessions were added with button bodies, and a birthday sentiment completed the card.  A twine bow was added for a bit of sparkle.

I hope you have been inspired by my card, and will join us in our challenge this week.

Thursday, January 14, 2016

Birthday Wishes


Love and Best Wishes to you in this New Year!  Mindy with you today, sharing a bright and cheerful card for that special birthday celebration.

I started my card by die cutting the medium balloon from the Balloons die cut set by Impression Obsession from thin craft foam, then adhering it to my clear stamping block.  I then inked it up, just like a rubber stamp, with a pale grey ink and stamped it on some white card stock. I then colored each one with my Copic markers and shaded each one with a darker color.  I then stamped the Flower Gift Boxes, also from Impression Obsession, and fussy cut the top box with bow to add beneath the balloon bouquet.

The background paper used on the card base, and Happy Birthday sentiment were both from the Say Aloha paper pad from Kaisercraft.   This card with the bright and cheerful colors of the balloons, could also be used as an entry in our weekly challenge on the Classy Cards 'n Such blog.  Our theme this week is making a card with Bright and Cheerful colors. Hope to see your entry soon.

Wednesday, January 13, 2016

Little Butterflies


The theme this week for our challenge at Classy Cards 'n Such is using Bright and Cheerful Colors. Mindy here with a card where the bright colors inspired me to  feature butterflies in all the cheerful colors.
My card started with a colorful background paper from the Say Aloha paper pad by Kaisercraft. This pad has so many beautiful papers to choose from, and also has coordinating tags and sentiment strips to use on your cards. I chose the coordinating tag for the focal image, and mounted it on a die cut from my Spellbinders stash. Then, from card stock scraps, I die cut Medium Butterflies from Impression Obsession in all the bright colors and adhered them to the card base with Art Institute Dries Clear Adhesive.  I then added a tiny bit of glitter to each butterfly body to give the card a little sparkle.

As the card suggests, Enjoy the Little Things in life, no matter how small.  Have a great week, and join our challenge with a card that celebrates all the bright colors.

Thursday, January 7, 2016

Best Friends


Best Friends bring out the best in you!  How true is that?  Mindy here to share a friendship card that is simple to do, with a few patterned papers a couple of stamps, and a die cut or two.

I started with a card base and matched one patterned paper and two solids to it.  I then trimmed down a half inch at a time or more, to make my layers that the stamped image and die cut would be adhered to.  I stamped the flower cluster with banner from the Heartfelt Creation set Majestic Morning Accents Pre-Cut Set, and colored it with my markers.  I stamped a sentiment from the Floral Vintage Labels Two by Just Rite Stamps on the banner then fussy cut out the image and mounted it to my card front with Joy! Foam Pads Small.  I also die cut a butterfly from my collection of dies, and shaded the wings to match one of my solid card stocks.

Have a wonderful week, and join us again for another beautiful classy card.

Wednesday, January 6, 2016

Beat the Blues

It's the beginning of a New Year 2016, and time to begin a new chapter in your book of life.  Mindy here, with a frosty look at one way to beat those wintertime blues, by keeping yourself cozy and warm.

 My card for this week's challenge at Classy Cards 'n Such blog is my interpretation of our theme, Winter Blues.  One way to keep warm and cozy is to wear your gloves or mittens when your hands are cold.  I knew I wanted to feature my mittens, so I started by cutting my mittens die and adding background layers to feature them prominently.

I used the following dies available in the Classy Cards 'n Such online store:
Stacked Mittens by Poppystamps
Fleur de Elegance by Spellbinders and
Oval Regalia by Spellbinders

The background of my card base was embossed with the Juliet Damask embossing folder by Anna Griffin, before adhering the die cut backgrounds with 1/2" Scor-Tape and Joy! Foam Pads Large.  I colored and decorated the details of my mittens with a glitter gel pen, and tied a simple satin bow to match my colored layers.  The sentiment was stamped on a die from the Oval Regalia set with a stamp from the Just the Right Words by Becca Feeken stamp set from Just Rite Clear Stamps.

I hope you have enjoyed my card and will consider entering our challenge with a card of your own. Hope to see you soon.