Saturday, November 29, 2014

Sunflower Birthday


I am featuring one of the new Sunflower stamps from Heartfelt Creations available in the Classy Cards 'n Such online store.  Mindy here, with one of my favorite New stamps for coloring with Copics, colored pencils, or watercolors.

I started with a fall background colored card stock base, Mandarin Curious Metallic card stock in the A 2 size. I stamped a background on white card stock with the Heartfelt Creations- Rye Grass Flourish Set,  no longer available at the Classy Cards store, in light blue and orange Memento Ink. I then stamped the Large Sunflower Stem PreCut Set in the center, and the butterfly on a separate piece of white card stock. I then colored in the flower and butterfly with my Distress Markers by Tim Holtz, and fussy cut around the butterfly.

Before adhering the background to the card base, I used my X-Acto knife and cut a slit on both sides of the flower and inserted a strip of Stardream Fuse Vista metallic paper as a ribbon.  I then attached the butterfly to the card, and stamped the birthday greeting from the Mums stamp set from JustRite Cling stamps and added Amber Rhinestones and darkened them with a copic marker before attaching them to my card.

Have a Sun- shiny and Happy Day!

Wednesday, November 26, 2014

Holiday Delight


Everything is beautiful in it's own way, are the lyrics to an old song I sang while growing up. Hello friends, Mindy here with you to share a bright and beautiful card with you that is made using bright and cheery colors.  Our challenge this week at Classy Cards n' Such is Christmas Brights.

Of course, these are not your traditional Christmas colors, but are fun to work with anyway. If you would like to have a list of the products I used and how I put this card together, visit the morning blog entry at Classy Cards n' Such Blog to see more.

I hope you have enjoyed this card, I sure had a great time creating it, and thanks so much for visiting with me today.

Sunday, November 23, 2014

Create in Color


Hello Everyone!  Happy Thanksgiving Week!  I decided to start off the week with a playful little card full of color and creativeness.  I have been playing with acrylic paints and Distress Inks on my Gelli Plate, trying out the transfer tape technique.  

The basis of this technique is that you put down color on your plate, letting it dry between layers.  The layers are built from the background toward you, because what you see is what you end up with.
When all of the layers are dry and you are pleased with how it looks, you adhere your packing tape to the top burnishing it down to the paint layer.  You then lift the tape,  the paint sticks to the tacky side and that is what you create with on your cards, canvases, and art journals.

When your paint layers are dry on your Gelli plate you can also stamp on top with Archival Ink  (permanent) and rubber stamps.  If you look closely at my tape strip, you can see where I stamped a musical stamp, and a Hero Arts Flower before applying and lifting the packing tape.  It is so much fun, yet time consuming, when you have to let all the layers dry before proceeding to the next step.

I also stamped a Frida stamp from Paper Wings Productions and colored her with Pitt Pen markers from Faber-Castell.  After fussy cutting around the image, I spattered some Distressed Ink on the card to give it a little dimension behind where I was placing the stamped image. I finished off the card with a sentiment strip created with lettering from the Everyday Compliments die from Die-versions.

Of course, the artist, Frida Kahlo was known for her bright colors she used in her artwork, so it was only fitting to use her image on my card with the bright colors transferred with my packing tape. There are several videos on YouTube that describe the Transfer Tape technique using the Gelli Plate.
If you have several hours to waste, (ha ha!) check them out, and have a great day!
Mindy

Friday, November 21, 2014

Garden of Life


I love this stamp set so much!  Not only are the sentiments so beautiful, the rose is one of my favorite flowers. Hello, Mindy here, to share a card that I truly believe is the epitome of beauty and class.

I started with a green card stock A 2 size card base and matted a piece of rusty red card on top, leaving a small border. The color combination was so nice, I decided that I wanted some of it to show through, so after stamping my image from the Hope and Love Vintage Labels set and coloring with my Distressed Markers, I decided to die-cut it with the A 2 Card Creator- Filigree Delight from Spellbinders. I also cut one of the Filigree Frames from camel brown stock and trimmed out the center so the stamped image would show.

I lined up the two layers and glued the camel frame on top of the white layer. Then using Joy! Foam Pads- large I adhered the lattice layer on top of the matted card stock layer for dimension. To complete the card, I added a small sheer bow and Allure Swirls -Silver Rhinestones, cut apart and placed on the stamped flourishes for added sparkle.

Have a wonderful day, and In the Garden of Life, Let Love Grow!

Monday, November 17, 2014

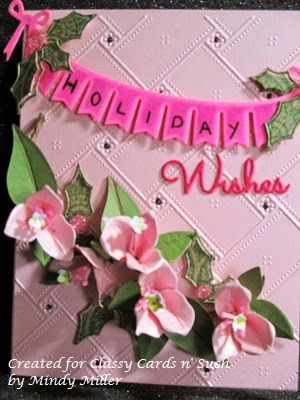
Bougainvillea


Our Card Challenge #59 for this week at Classy Cards n' Such is Christmas Blooms. Hello friends, Mindy with you today, to share a different bloom for Christmas with you on my card.   I live in So. Texas and winters are normally very mild here.  We usually don't get the colder weather until January or February.  My mother had a very beautiful bougainvillea in her yard that bloomed into December.
I am using the die set by Susan Tierney Cockburn, Bougainvillea Thinlits by Sizzix as the focal point for my card.

To find out more about materials used for this card, check our Monday (pm) blog post for more.

Of course, this card will need to be hand-delivered or mailed in a 3-D plastic box, because of it's dimensional flowers, but with all of the beautiful details, it will become  a showpiece wherever it is displayed.  Thank you for joining me here today!

Friday, November 14, 2014

Lacey Ornaments


Once in awhile my mind comes to a halt when creating cards for my Design Team duties.  This was one of those times,  and I started playing with some of the bits and pieces from my Goodie Box where I put die cuts as I try them out, and stamped items, along with paper scraps large enough to do something with.  It's Mindy here with you today, sharing a card made from bits and pieces.

If you would like the directions of how this card was made, or the elements used in making it, check our blog at Classy Cards 'n Such Blog. The afternoon post will explain the procedure and list all supplies.

If you are in the mood for a little shopping, be sure to visit our online store. There are so many New and awesome products available, click HERE, to begin shopping and don't forget to use coupon code MINDY-10 at checkout to receive a 10% discount on your complete order.  Happy Holidays!

Thanks for stopping by and visiting today!

Tuesday, November 11, 2014

Dotted Trio


Greetings, friends.  Mindy with you today, sharing a holiday card that sparkles and shines with ribbons and ornaments.  Our challenge this week at Classy Cards 'n Such is Ornaments and Ribbons, and I selected both to feature on my card.

For more information on all of the supplies used, and my step-by-step guide, check out the Tuesday morning entry on our blog at www.classycardsnsuch.blogspot.com.

Ornaments are so much fun to create on cards, why not make a card with ornaments and submit it to our challenge?  Be sure to check out the requirements necessary to play along, and show us what you create.

Have a Happy Day, and Keep On Creating!
Mindy

Saturday, November 8, 2014

A Cup of Love


A pretty pink card in remembrance of Breast Cancer Awareness, this is Mindy with a card made for a dear friend who is a Breast Cancer Survivor.

I started with this lovely pink card base that I stamped with the ribbon symbol from a rubber stamp I have had for many years. I'm not sure who made this stamp, but with October being Breast Cancer Awareness Month, there are many companies that are promoting their sets with the ribbon image. I stamped the image with Versamark clear embossing ink and embossed with Clear Fine Detail embossing powder by Sparkle 'n Sprinkle.

I then stamped the cup of daisies from the Daisy Bouquets by Inky Antics and colored with Distress Ink Markers from Tim Holtz.  The Tiny Doilies from My Favorite Things were die cut and adhered to the card with Art Institute Dries Clear Adhesive and embellished with Baby Pearls- White. I fussy cut around the cup of daisies and used  Foam Pads- Large by Joy! to adhere the cup to the card front.

On a small tag, I stamped the sentiment from the set Hope and Love by Just Rite clear stamps and attached it with foam tape around the cup handle.

Thank you for joining us on the blog today. I hope this card inspires you to make a card for someone special today!

Wednesday, November 5, 2014

Sparkle and Shine


Hello friends, Mindy with you today, to share a sparkling and shiny card that reminds me of the old Aluminum Christmas Tree of years past.  Our challenge this week is to create a Gold or Silver or both, Christmas Tree as per our Inspirational Photo.


As you can see from my drawing, I started my card by mapping my tree form with strips of matching card stock to the front panel of my card.  Then I used my Ponderosa Pine Sprig from Dee's Distinctively dies to die cut three sets of the sprigs (approximately 24) from the Tinsel Holographic Paper from The Paper Cuts.  I then cut each sprig in half lengthwise, and began gluing the sprigs to the card stock branches with the Dries Clear Adhesive from the Art Institute of Glitter.  This adhesive dries clear and quickly and makes assembly of the tree a snap!

For more information on the supplies I used, and how I used them, you can check our blog HERE!

I hope you have enjoyed my card today, and will create a card to submit to our weekly challenge called Trim-A-Tree, Gold and or Silver!
Mindy

Sunday, November 2, 2014

Creative Blog Hop


Hi, I am Mindy, welcome to my blog! I hope you stay and look around awhile, I have many handmade cards and goodies to share with you. I am retired, so I have plenty of time to play with my stamps, paper, inks, and paints. I also love TV and movies, and music is a form of inspiration I use in my Art.

I was invited by my friend and fellow Design Team member, Graciela Chavez de Mejia, to participate in this Creative Blog Hop.  It was created so fellow artists and crafter's could get to know each other. I am enjoying my time here, because even though we all may create some sort of greeting cards or art, everyone has their own styles and artistic techniques they like to use. So let's get busy with today's business.

1.  What am I working on right now?  I have sample card obligations for the design team I am on, and still participate in several weekly card challenges.  I try to complete one mixed-media canvas a week and make entries in my art journals daily.

2. How does my work differ from others in my genre? I don't know that it does differ, but I try to use my years of experience in the retail crafts business to promote products and techniques that are popular, or ones that other crafters  may have forgotten.

3.  Why do I create what I do?  I have always loved making and sending greeting cards, and try to personalize each one to the party it is being sent to.  Greeting cards are also a perfect size project to try new products and techniques on.

4.  How does my creative process work?  Most of the time my creative process works on the spur of the moment.  I find out about a challenge or project I am interested in, and my brain kicks in and starts picturing products or techniques that I have seen demonstrated or published. I then try to work those thoughts into a greeting card size project and begin to gather and create pieces that will work together for my card.  Many artists used sketches or drawings to inspire them, but drawings don't help me in the least. Photos and images inspire me to dissect and remove parts of a picture to use in my work, or to create from something I have recycled or refurbished.

I would now like to introduce you to three talented friends who also love the arts and to craft.  They will be sharing their answers to the questions and their friend list next Monday, November 10, 2014 so be sure to visit their blogs and say Hi!


Diane

Diane Hover - Michigan, USA   Diane is a Design Team member for a handful of companies and keeps very busy with her design team duties.  She enjoys paper crafting, sewing, reading, her grandchildren and gardening. She also has a great love of animals, including many cats and her dog-child, "Nellie" of whom her blog Nellie's Nest is named. She was one of my first mentors when I began my blog, and I cherish her knowledge and artistic skill that she readily shares.


Julie

Julie Mogford- Texas USA   School teacher by day, crafter, artist, and creativity explorer by night. Julie loves playing with stamps, paper, paints, and other mixed-media supplies along with watching TV/movies, reading, and listening to music.  She also co-owns her own business, and online company Winnie & Walter, that sells clear stamp sets, digital cut files, dies, and stencils that she and her business partner design and create themselves.  They are a fairly new company yet have customers and stores all around the world they sell to.  

Julie and her husband have one perky pup named Walter, who is a mascot for their company.  Visit Julie on her blog; www.starlightwindsong.blogspot.com and don't forget to say hello, and leave some love.


Carrie
Carrie Edelmann Avery- Texas, USA   Carrie is one very talented and hard working woman, and in her words, "I think of myself as a modern day renaissance woman." "I juggle all kinds of crazy interests and endeavors in order to do all things that make my life fulfilling."  She now owns and operates an online store, Paper Wings Productions, from which she sells a variety of unique art supplies, along with her own line of clear and cling mounted rubber stamps, many of which she designs with some of her friends.

 She is also a remarkable teacher and continues to teach a wide variety of classes and workshops that feature different paper and mixed-media products and techniques including bookbinding and jewelry making. She has also had many articles published in numerous magazines and booklets, and her extreme knowledge of papers and art supplies, taught me much of what I know today.  Carrie has also been kind enough to offer a shopping discount at her store, Paper Wings Productions, for followers of my blog. Use the code " PWP*FAN" at checkout to receive a 25% discount on your order.

She is married and has two children at home that keep her extremely busy. Check out her blog;      Art and Classes of Carrie Avery at www.carrieavery.com.


Thank you so much for stopping by for a visit during this Creative Blog Hop.  I hope you have enjoyed getting to know a little about me and my "Friends", and that you will visit with them next Monday on their own blogs.  Have a very nice day, and remember to Keep Creating!


Saturday, November 1, 2014

Floral Fancy


Mindy with you today, sharing a card I made recently for a dear friends birthday.  As you may well have noticed, I love flowers of all types to stamp on cards and color. When I saw this Iris set by Our Daily Bread Designs, I knew I must purchase it from the Classy Cards 'n Such Online Store.

Good Saturday afternoon friends! I hope you will join me on the Classy Cards Blog to find out which wonderful products I used to make this lovely card.

Thank you for visiting with me today, and I hope you enjoy your stamping time!