Showing posts with label distress markers. Show all posts

Sunday, November 23, 2014

Create in Color


Hello Everyone!  Happy Thanksgiving Week!  I decided to start off the week with a playful little card full of color and creativeness.  I have been playing with acrylic paints and Distress Inks on my Gelli Plate, trying out the transfer tape technique.  

The basis of this technique is that you put down color on your plate, letting it dry between layers.  The layers are built from the background toward you, because what you see is what you end up with.
When all of the layers are dry and you are pleased with how it looks, you adhere your packing tape to the top burnishing it down to the paint layer.  You then lift the tape,  the paint sticks to the tacky side and that is what you create with on your cards, canvases, and art journals.

When your paint layers are dry on your Gelli plate you can also stamp on top with Archival Ink  (permanent) and rubber stamps.  If you look closely at my tape strip, you can see where I stamped a musical stamp, and a Hero Arts Flower before applying and lifting the packing tape.  It is so much fun, yet time consuming, when you have to let all the layers dry before proceeding to the next step.

I also stamped a Frida stamp from Paper Wings Productions and colored her with Pitt Pen markers from Faber-Castell.  After fussy cutting around the image, I spattered some Distressed Ink on the card to give it a little dimension behind where I was placing the stamped image. I finished off the card with a sentiment strip created with lettering from the Everyday Compliments die from Die-versions.

Of course, the artist, Frida Kahlo was known for her bright colors she used in her artwork, so it was only fitting to use her image on my card with the bright colors transferred with my packing tape. There are several videos on YouTube that describe the Transfer Tape technique using the Gelli Plate.
If you have several hours to waste, (ha ha!) check them out, and have a great day!
Mindy

Monday, July 21, 2014


Welcome Friends! My first card with my design team duties at Classy Cards 'n Such will be showcased on Wednesday of this week, challenge #42 Buttons and Bows.  To see more about how the card was made, check out the blog at Classy Cards, and while there, be sure to check out all of the NEW items available in the Classy Cards 'n Such Online Store. 

The card pictured here, is from last week's challenge #41- Day at the Beach.

You can also use my coupon code MINDY-10 (all caps-no spaces) on all of your purchases at the Classy Cards Store!  Just enter it in the "apply coupon code" box before checking out, and you will receive a  welcome discount on your order.  You may also click the design team box in the top right column of this blog, and that will take you directly to the store.

In the right column of the Classy Cards 'n Such Blog, there is also a link to the Challenge Calendar.
Click on it to get a list of the upcoming challenges, along with lots of inspirational photos.  Maybe you will wish to submit a card or two, and join our Challenge fun! There is a super prize available weekly, each prize usually corresponds with the theme of the challenge and is from the Classy Cards 'n Such online store. Be sure and let me know, if you have any questions about the challenges. 

I hope you are all having a wonderful Summer!  The temperatures have been hot, but luckily no 100's yet here.  Stay cool and comfortable, and I will see you again soon.
Mindy

Thursday, January 9, 2014

Cozy Winter Wishes To You

As the Polar Vortex has travelled across the U.S. many folks have encountered very, very cold temps snow and ice. Here in So.Texas, it has warmed up quite a bit, and the weekend temperatures are expected near 70 degrees. We won't need those winter mittens this weekend, but I still wanted to wish you all, cozy winter wishes!  This will probably be one of the last winter cards I make for the year, but there is still more winter to come, so you never know.

Today's card features the Warm Winter Mittens Small Clear stamp set from Hot Off the Press. The mitten stamp was stamped on Neenah white card stock with black Memento ink, and then colored in with my Tim Holtz Distressed Markers.  The image was then trimmed with a small oval die from the Classic Ovals set from Spellbinders. I then cut a little larger oval from a teal card stock to back the oval.  For the background card base, I embossed it with the Dotted Swiss embossing folder and my Cuttlebug machine, with a technique I saw demonstrated on YouTube. The video showed how you could emboss the top of the card with your folder, and then skip a strip and emboss the bottom of the card. I might also mention that this is a top-fold card, therefore making it easier to get the embossing folder closer to the edge of the card. After the card is embossed through the folder, you remove the card and using your score board, score a line where the top embossing ends and the bottom embossing starts. You get a strip of card that is smooth to decorate, either with washi tape as I did, or with stamping or regular ribbon.

As I mentioned, I used a strip of black dotted washi tape, and then using the sentiment that came in the stamp set "Cozy Winter Wishes" stamped on a small white oval tag and attached with foam tape on the strip. For final decoration I attached a metal JOY banner with double sided tape to the top corner, and tied a strip of teal shaggy twine around the top of the card.

I hope you have all kept warm during the huge freeze, I have several friends who barricaded themselves in their craft spaces for the duration. I can't think of a better way to spend a cold day than stamping and creating, dressed warmly with a nice big cup of hot tea or cocoa. Enjoy! 

Monday, December 16, 2013

Sending Christmas Cheer

Happy Holidays to One and All!  I am sending Christmas cheer this year, that you and your families have a happy and blessed Christmas.

I have feverishly been working on making these my personal greetings this year. I only had to make a few, so since these are a little fancier than I normally send, I decided to spend the extra time making for my "special friends."

The main stamped image is the "Holiday Shopper" from the Deep Red Clingstamps company, and I got these through Simon Says Stamp. I used my Distressed Markers from Tim Holtz to color in the images, and then used my Wink of Stella glitter pens to add a little sparkle. The die cuts I used are from the Spellbinders Resplendent Rectangles and Decorative Labels Eight sets.  The printed stock behind the stamped image is a page from the 12 Days of Christmas paper pad from Graphic 45. The rectangles are about the size of an ATC card, and let just enough of the beautiful prints show around the shopper.  The saying is  from a Christmas Greetings set from My Favorite Things.  Inside the red card base, I adhered a 3" wide strip of  Christmas patterned paper that I could write my greeting on.

They are now done and on their way across the USA, so I can now play a little with some of my other Christmas stamps for cards that I will attach to gifts or hand deliver to friends here in town.
I hope you all have a wonderful week full of baking and shopping and getting together with family and friends. Enjoy!

Monday, December 9, 2013

Do What Makes You Happy

Today's post is another card made with the same "recipe" as yesterday's post.  Again using the video from YouTube, I cut the card base from heavy weight card.  This stamp is another cling stamp set by Art Gone Wild, titled "Makes You Happy!"

Both of these stamp sets are multi-sectional red rubber stamps that make an awesome grouping.  Of course, with my base card being only 4 1/4", I had to cut away several of the squares to fit on the front of the card.  After stamping on white card, and coloring with my Distressed Markers, I trimmed away two squares, and added them to the design inside the card.

Again, I die cut a border, this time from the Venetian Accents die from Spellbinders and adhered it to the inside of the card base. When the card is opened, you can prop the top flap behind the border, and it forms your easel card.  I also added a band of white card inside so that I could write a message.

Thank you for visiting, I really enjoy reading your comments about my cards. Have a great week, and stay warm if it is cold where you are. See you again soon.   Mindy


A Special Gift

Your friendship is a Special Gift!  Hello Friends! Today's card is an easel card whose design aspect was found on the Splitcoast Stampers tutorial blog from YouTube.

I just received this wonderful stamp collage from Art Gone Wild Stamps, and the title is "Your Friendship." I stamped out the entire image on white cardstock with Tuxedo black Memento ink, and then colored it in with my Tim Holts Distressed Markers. The entire image consists of 5 squares, 4 flower images and the one sentiment word rectangle. Since the card measures 4 1/2"X 4 1/2", I trimmed off 2 floral squares, and adhered them to the inside of the card.  I matted the image for the front of the card with an irridescent sparkly silver paper, and then another layer of white stock.  For the snowflakes, I cut two from white stock and two from the sparkly silver stock. I then added a clear rhinestone in the center for bling.

Inside, I cut a band of the silver stock and placed it on the base, and then added the Asian Accent Border from Spellbinders cut in avocado green as the stop guage for the front of the easel card.

You tuck the front of the card, as you open it, under the edge of the loopy border and that holds the card open to set on your table or desk. I'm sorry I cannot show the card in dimension, but my digital camera is hiding from me at the moment, and I haven't had time to go "seek" it.   To see the card in 3-D, please search YouTube for video on Easel Cards or the Splitcoast Stampers tutorials to get more ideas on these cards.

Have a wonderful week, and stay safe in your travels for the holidays.

Wednesday, June 5, 2013

Butterfly Happy Birthday!


Good Wednesday morning to my fellow cardmakers!  I had to get busy today and make a birthday card for my birthday buddie, Lisa Knight, who lives in Knox, PA. I have to get the card in the mail pretty soon, because it needs to get there by June 11. Here's what I did to get started!

First I took a sheet of Blu Raspberry card stock from My Favorite Things, and cut the front panel for an A2 size card. I then punched a 3" circle from Banana Split stock from MFT and got out my background stamp "Flowers, Lines, & Dots from Hero Arts Stamps, and inked it up with Cottage Ivy green Memento ink.  I centered my circle of yellow in the middle of the inked stamp then pressed down to transfer the design to the circle.  I then reinked the background stamp and stamped it on the blu raspberry stock. By doing so seperately, I could then position the circle right in the middle of the blu raspberry piece, matching the designs of both to look as if they were stamped at the same time. I then colored in some of the flowers in the design with my White Distressed Marker from Tim Holtz.

In the meantime, I cut two delicate butterfly designs from Rosemary & Thyme 6 X 6 paper pad from Paper Wishes.I used the Sm. Faerie Queen Butterfly Die to cut two butterflies and two background wings from coordinating prints. I then used my Mono Adhesive to glue the layers together, and put them aside to dry. I also punched a single butterfly out of dotted paper, and a banner stamped from the Banneriffic Clear set from Lawn Fawn.  The greeting, "Happy Birthday" was from the Birthday Elephant clear set from Inky Antics.  While all my parts were drying, I was gently placing them on the card base to see where exactly I wanted them.  As I arranged, and rearranged things, I decided that it needed something white amidst all that Blu Raspberry color.  I then decided to cut a border of white from my Nestabilites A2 Distressed Card Creator from Spellbinders. That gave it just the pop of white I needed to break the monotony of the blue.

Now it was time to adhere all the elements. Of course, the yellow circle was centered, so I used double stick tape to attach the white border around the circle. I then glued the butterflies down, just along their bodies with the Mono adhesive.  I then attached the birthday banner across the middle of the circle with foam dots, and added a few acrylic stones to the butterflies and to the background to give it all a little bling!  I left the wings of the butterflies unglued, so they would be able to stand up when the card was removed from the envelope. I then attached the whole unit to a white card base, and it was ready for me to write a personal message to my friend.

I'm glad you stopped by today, to view my most recently made card. I hope you enjoyed the process of how it was done, and was inspired to try some of the elements on a card you will make. Have a wonderful Wednesday, and I will see you again soon.

Mindy

Wednesday, March 13, 2013

Thank Ewe Mark, from Deadbeat Designs Stamps

Thank You Mark, from Deadbeat Designs Stamps!
My post today is a card I made after the mail-lady came. I received a small package from Mark Jetton at Deadbeat Design Stamps, with stamps that he sent thanking me for entering his Texas Independence Day Card Challenge.

I think I liked the "thank you gift" more than the prize offered, especially since the stamps I received aren't even on his web site yet! The shadow Texas stamp, the barn/house with Texas Flag roof, and the small distressed Texas cut-out stamp, are the new stamps and when I added a few others from my stash of Deadbeat stamps, I had a cute landscape card to play with.  Of course, I will have to work on my content and perspective a little bit more, along with my shading and coloring, but all things considered, I think it made a pretty cute "quickie" card.  Adding Deadbeat's Clouds and Buzzards stamps, and a little banner that said "Thank Ewe!"  covered part of the "coloring" I really didn't care for. 

On the inside of the card, I typed with the computer; "No sheep, you say! They are inside the barn, hiding from the buzzards!"  That's my slight attempt at humor since thank EWE, (refers to a female sheep) and there are no sheep in the picture...... OK, I didn't say I was funny!

If you are interested in checking out Mark's great stamps, visit his web site http://www.deadbeatstamps.com/. He has all types of fun and interesting stamps, not only Texas stamps.
 I hope you are all having a wonderful week. Take care, and thanks for visiting my blog. Happy Stampin'!

Sunday, October 21, 2012

Dia de los Muertos

Hello friends,
Yesterday I finally had time to get out my NEW stamps from Paper Wings Productions, that I had ordered and play with them. This set is titled "Dia de los Muertos Hombre "clear stamp set. Click here to see more of their New stamps that are available now!
I especially liked this set because of the papel picados and rose garland spray stamps that were in the set with the "hombre".

I have never celebrated Dia de los Muertos, (Spanish for Day of the Dead) which is a Mexican holiday celebrated in Mexico and around the world in many other cultures. It is celebrated on November 1 & 2 and focuses on gatherings of family and friends to pray for and remember those who have died. I have enjoyed hearing and reading the history of the holidays, and always thought it was a good idea to celebrate and honor family members and friends who have passed on before us.

Traditions include building altars and decorating with pictures of the deceased, sugar skulls, marigold flowers, and favorite foods and beverages of the departed. Celebrations should take on happy tones, remembering fun events and anecdotes about the departed.

This card made me happy while making it, because it reminded me of the great times I spent with my Mother and Dad before they passed away. I first stamped the hombre on white card stock with Memento black ink, and colored his hat, shoes, and facial decorations with my copic markers. Then I stamped the rose garland twice, and colored the roses in pink, which was my Mother's favorite color rose. The shrine stamp is from Stampers Anonymous, and was colored with my Distressed markers. The pieces were fussy cut and then mounted on some printed scrapbook paper to give it a little pop! A length of matching ribbon was knotted in the center and adhered to the unit before attaching it to the card front, which I shaded along the edges with chalk ink.  I then attached the banner and my card was complete.

I don't know for sure if I will send out this card or not. I may just keep it for myself, happily remembering my friends and relatives that have gone on before. Take time to remember someone you love.

Friday, September 7, 2012

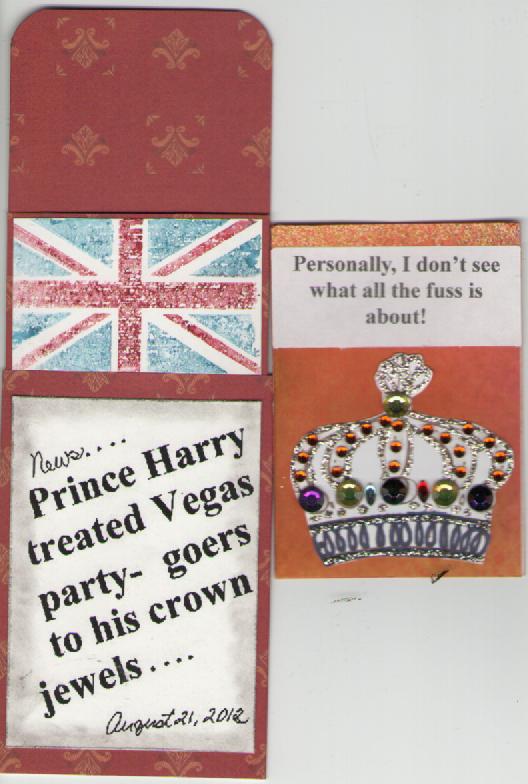
CROWN JEWELS theme ATC's for September


The second theme for the September ATC trade was Crown Jewels. Since there was so much in the press about Prince Harry's escapades while he was in Las Vegas recently, I decided to do a spoof of the headline on my Artist Trading Card.

On the front, I printed off the headline on a piece of white stock, and  inked the edges with black soot chalk. This was an outer pocket. Then on the inner pocket that slides out, I stamped the English flag stamp on white stock, inking the stamp with the fired brick and faded denim Distress Markers by Tim Holtz.

On the inner most card I printed a sticker that read, "personally I don't see what all the fuss is about!" and stamped an image of a large crown and embellished it with stick-on gemstones and lots of stickles to make it really sparkly!
It really caused a chuckle at the trading card meeting. Everyone broke out in laughter, and I was so surprised, it really made my day!

I guess they were expecting something else????????????
Have a wonderful day, and a great weekend. This only goes to show you that a little thing like this card can cause  laughter, which in many ways is considered the best medicine.


Friday, August 24, 2012

SWEETNESS

Hello friends,
Sweetness is what I feel when I see this lovely fawn napping in the grass. This is the first time I have used this stamp, and I really like the way it stamped out.

The weather here in South Texas has been cooler the past week, and all the creatures have been coming out at sundown to enjoy the cooler temperatures. There is a private church school down the street from my home, where in the evening right before sunset, you can see a family of deer strolling through the school grounds into the wooded area beyond.  They stop and frolic in the well manicured lawn of the school, sometimes laying in the cool, freshly watered grass before they scamper off into the wooded area behind the school. I love to watch them graze and frolic, and wonder if they feel safe living in such a populated area as San Antonio. They inspired me to make this card and add it to my collection.

The entire picture area is the stamp, and I stamped it on watercolor paper with Versafine Sepia ink. Then I gently colored it with my Distressed Ink markers. I stippled on the blue background and them matted the picture in a light beige card stock, before mounting it on an animal printed card base. I believe I purchased the box of animal print cards at JoAnn's Crafts. I thought they were so unique, and would add an element of texture to my animal themed cards.

Take time to enjoy the nature in and around your home. Sometimes you too, will be inspired to use this nature in creating ideas for cards and art projects that you do. Take care, and visit again soon.

Friday, August 17, 2012

Pretty as a Peacock


Hi there stampers! Today's card is a peacock stamp I forgot I had. Several months ago when I was out shopping, I found this wonderful peacock feather ribbon. Of course I didn't know what I was going to use it for, but it was just so pretty, I knew I had to have it.  After months of looking for a peacock rubber stamp, I found this one in one of my stamp binders. It is by Inkadinkado, cling mounted, and it fit perfectly along the feather ribbon.


It was a little too tall for an A2 (quarter fold) card, so I checked my stash and found this 6" square card. I glued down the feather ribbon first, and then the strip of patterned paper across the bottom. Next, I stamped the peacock on white card stock and colored in the feathers on the bird with my Distressed markers. I added the branch stamped directly on the card base, two one inch circles of dark blue card stock and the title phrase before cutting out and adhearing the peacock. After the bird was glued on with foam tape, I used some Stickles and glitter pen to add a little bling to the peacock.

I think this made a really nice friendship card and I intend to send it to a dear friend that loves peacocks. Have a great weekend, and stay cool where ever you are.


Monday, May 14, 2012

Hello . . . . is anyone out there?

Hello,
I hope everyone had a wonderful weekend.  I was busy making a very good friend of mine a special gift to send to her. I know many people are no longer in need of what we used to call in the "olden days", a pocket telephone book.  She recently lost her cell phone, along with all her "numbers." She was in a tizzy rushing around trying to find telephone numbers for all of the people she had in her phone. "If I hadn't tossed out my old phone book, I could just get them from there!" she said.

I took card stock and made two covers about 3"X5" and added some ribbon pieces for decoration. Then using a clear stamp set from Paper Wings Productions called "Vintage Technology" stamped the "old timey" telephone on a scrap of white card stock. Using my Tim Holtz Distress Markers, I colored in the phone with an olive green and old paper color combination, and used a 3M foam dot to adhere it to the front. In the same stamp set was the word "hello", so I used it to stamp the words all around the card.  I made a title strip with handwritten words "Number Please" and pop dotted it to the top of the book.

For the inside, I copied some generic lined paper on my computer, trimmed it to size, and adhered it to the inside so that names and numbers and other information could be entered into the book.

New technology is wonderful, but sometimes the "old timey things" are handy to have. Even when we think we are "techno savvy!" Until next time, call a friend you haven't seen in awhile, and let them know how much you miss them.  It will make you both feel so good!