Showing posts with label rubberstamps. Show all posts

Thursday, April 17, 2014

Sailing, Sailing. . . . . . .

Sailing, sailing over the bounding Maine. . .  A song that sprang forth in my brain while making this card.

I am so in love with die cuts, that lately I have been trying to use at least one on each card I make. I enjoy how they give dimension to cards without having to fussy cut the image. To begin today's card, I recently purchased this sailboat die from Die-Versions Universally Crafty. I won a gift certificate to their online store, and found three dies to purchase with my "winnings"!  I already had this awesome 6X6" background paper pad from Websters Pages Petite Papers, that I purchased at the Classy Cards "N Such online store .
The Yacht Club paper seemed to match my card theme perfectly, so I cut the background to fit my A2 size card front, and then chalked around it with Prima chalk ink.

I then die cut my sailboat in white, red and brown print card stock. I started with the boat in white, then paper pieced the sails from the red, and the body from the brown printed paper. I adhered the layers with Tombow Mono Multi liquid white glue, and then used foam tape to adhere it to the card front. I stamped the 
"wanted" and "No.4" with rich cocoa Memento ink, and my card was completed.

I am entering this card in the weekly challenge at the Classy Cards 'N Such blog: Challenge- Die Cuts .

I hope you will join in the challenges at Classy Cards 'N Such. Check out their calendar for a listing of their weekly challenges, and start creating and sharing your talents with others. 
Mindy

Monday, April 7, 2014

Art Journaling Class I am Taking

Hello Friends! I am in the process of taking an Art journaling class from Christine Urias on her blog;
Scrap Time;"More than just Scrapbooking"  and it is called "Exploring Art Journaling 3".  It is a 30 day class, each one concentrating on different media used for backgrounds and pages, with a different journaling prompt each day.

It is very interesting, and is helping me use many of the products I already have in my studio, to make amazing pages. I am posting a few of the ones I have completed so far in the class.


Some of them are two page spreads, and other's are just a one page spread.  I am doing them in my small journal from Dyan Revealy and Ranger.  If I really get into one specific technique or medium, I will do another page in my larger journal. The background for the Transportation page (above) is done in acrylic paints mixed with Gesso.

The background for the favorite TV shows page (left) is made with Lyra watercolor crayons.

And the background for the Daydreamer page (bottom) uses Stencils layered and then misted with Dylusions Sprays.

Most of my doodling and drawing is done with my Posca paint markers, and Dr. Ph Martin's Bombay India Inks.

I hope you enjoy seeing some of my Art Journal where I test out products and ideas, to see which I enjoy working with, and how they work together on a project. If you have any comments or questions, feel free to leave a comment or question below, and I will get back to you as soon as possible.  Have a Great Day!


Saturday, October 19, 2013

Stopping By to Say Hello . . . .and Thank You!

Today's post is a combo of cards that I have been working on. They have been decorated with papers/tags that I colored with the Tattered Angels Paint Systems that I purchased recently.  The first card, Stopping by to say Hello, uses a strip of watercolor paper colored with the Naturally Aged Paint System, Precious Stone; Turquoise, and then embossed with the Sea Beauty Embossing Folder from Spellbinders.

I adhered a strip of the watercolor paper down the left side of the A2 card, and trimmed with a row of cream iridescent double loop braid from Michaels' Dollar bin. I then added a cream colored fabric flower from Prima along with some pearl bling also from Prima. The Angel stamp is from American Art Stamp, and is stamped on Ranger glossy paper with Rich Cocoa Memento Ink and colored with copic markers.  I attached the angel with foam tape to pop it up, along with the sentiment stamped on a manila tag.

Card #2 has a manila tag colored with the same Turquoise Paint System, attached on top of a card base with a scrap of patterned paper as the background.


The angel is from the same American Art Stamp set, stamped and colored with the same ink and markers.  Using several leaf metal dies, I punched out some leaves from various green papers and attached a cluster to the card front and tied with a bow of Limeade lawn trimmings from Lawn Fawn.  I adhered a strip of wide Huckleberry rick-rack trim from Li'l Davis Designs and then stamped  Thank You on a die cut banner. The angel was again attached with foam tape to give it dimension on the card.

I hope you have enjoyed these cards as much as I enjoyed making them.  I love layering papers and tags, ribbons and embellishments.  I find it hard at times to stop, before making the card too thick, as to require more postage at the post office to mail them.  I know the poor Postal Service is going broke due to the drop in postal business, but I just can't see spending that much to mail an envelope. I hope you are all having a wonderful weekend. Until next week, Joy to all and enjoy yourself!
Mindy

Thursday, October 17, 2013

Trick or Treat . . . . . . . . .

Trick or treat, smell my feet, give me something good to eat! Why do I always hear this song in my head when I see someone in costume?  Halloween is just around the corner, and although I no longer dress in costume, I remember the days when I dressed in costume for work. I worked retail, and on Halloween we always dressed in costume to entertain the customers.  By the time I got home from work, and being on my feet in my costume all day, I usually changed into my jammies and went to bed, without handing out much candy. It seems the neighborhood I grew up in, grew up with me. So, in the later years there wasn't much action, except for the house across the street.  As the kids in that house grew up, the parents started putting up a large tent, and would be the waiting spot for parents while their kids were in the neighborhood trick-or-treating. They would serve coffee, hot chocolate, and cookies to the kids and parents, and would have music playing during the festivities.  Years later when the carloads of  kids would appear in our neighborhoods, their house was always the gathering place for frivolity and fun! If I had purchased candy to hand out, and no one visited our door, I would end up delivering it to "the tent" to add to their cauldron of goodies.

Now, the neighborhood I live in  has no children. I may buy a bag of candy that I like, "just in case someone stops by!" I usually don't open my door after dark anyway, you never know who is out there anymore.  So, Halloween is not that big a deal.  I do love the art of the holiday though!

In this card, I started with a Prima large tag, and stenciled black chevron stripes on it. I then added two cat die cuts, and an image from a vintage postcard.  The tag was trimmed to fit the A2 orange card base, and I then stamped "Trick or Treat" and a tiny star down the open side of the card.

I hope you all have a wonderful Halloween, and a spooky, kooky good time!

Monday, September 2, 2013

Celebrate Collage Card

Happy Labor Day, to one and All!  I want to thank everyone who visited this blog during our recent month long Prima Doll Blog Hop. It was a great success, and we met and shared out projects with many stampers out there. Now it's time to get back to our everyday postings of cards, canvases, and journals.  Today's post is a Collage card celebrating a dear friend's birthday. Let's check it out!


I started out with a beautiful wood=grain look embossed card stock in green.  I had a piece of clip art from the  August Nesting Components Vintage Kit from Paper Wings Productions. The photo was of four ladies with their trophies, which coordinated with my saying of "today is all about you" from the  Shenanigans Clear Stamp Set from CAS-ual Fridays Stamps.  I had stamped out the word Celebrate on a piece of watercolor paper colored with several greens, blues, and gold inks from Tattered Angels.  The technique I used to stamp the image on the tag didn't work out like I thought it should, so I cut off the word "celebrate" and decided to use it on this card.  I also used a sheet of 6X6 paper from Pink Paislee's Hope Chest pad, along with an index tab that coordinated with it.


To finish off the inside, I stamped Happy Birthday with the Shenanigans Stamp Set, and added three more pieces of the Hope Chest printed paper to finish the inside collage.

Have a pleasant week, now that the kiddoes are back in school. Maybe have some time of your own to get some card making done. See you soon!

Mindy

Wednesday, July 17, 2013

Hidden Recipe Card

Today's card is made using the same technique as the Botanical Pocket card posted two days ago. It is stamped with the A Pack of Pears stamp set from A Stamp In The Hand company on Ranger Glossy Card Stock. The difference is in the card style itself; instead of a pocket card, it is a recipe card, with the recipe hidden inside the card.  The recipe is attached to a strip hidden inside a slit in the front of the card. (See picture below)
(*NOTE* This stamp company is no longer in business, but there are many of their stamps available on EBay.)

The pear stamp is solid rubber and is colored using dye based markers directly on the stamp itself. These are so much fun to color, blending various colors on the stamp and then stamping on the glossy paper makes the colors so bright and vibrant you won't believe your eyes. The bumble bees are from the How Does Your Garden Grow set. Coloring is done with Marvy markers and stippling is done with Marvy Yellow Ochre dye ink pad.

The fun part of the card, is making the pull out recipe tab. Print the recipe out on regular printer paper, and cut out, leaving an inch border on one side of the recipe. Glue or use double stick adhesive to attach the recipe, to a scrap of the glossy card stock. Stamp and cut out the word "Pear" and used foam tape to apply it to the 1" blank space on top of the recipe tab. Cut a slit in the stamped front of the card, and slide the recipe tab into the slit.  The edge with the foam tape will stop the tab from going all the way into the card.  Then using double stick adhesive, tape around the outside edge of the front and adhere to the front panel of the card base. That way the recipe will slide in and out of the card front.

This type of interactive card is so much fun, and will really surprise the recipient. This type of card is also fun to make for friends when you have a Cookie Exchange, a Pot-Luck meal, or a special gift for a sick friend. Print out a favorite Soup recipe and then attach a Get Well card to the jar with the recipe enclosed.  What a fun way to say, "I Love You, and am Thinking of You!"  Have a great Thursday, the weekend is right around the corner! Keep Stamping!
Mindy

Monday, July 15, 2013

Botanical Pocket Card

Hello Friends, it's the beginning of a new week, and I have a little different style of card to show you today. It has been awhile since I have done cards using this technique that I learned years ago from the ladies at A Stamp in the Hand Stamp Company. I don't believe the company is in business anymore, but both ladies that taught this technique are still teaching stamping out and about. So for Joyce and Kat, I hope these cards make you proud knowing that what you taught years ago actually "stuck" in one stamper's mind.

To start with, you use a few different supplies from the normal basic card stock and stamps. The paper that gives the best result is Glossy Card stock, I got mine through Ranger. Using red rubber stamps and Marvy Inks and markers, you can create beautiful, and vivid color creations on that glossy paper.  I like to build layers on my cards using this technique.  Starting with the background images, in this card I stamped the large leaf spray in each of the four corners. When you use the red rubber stamps, you can color directly on the rubber with the Marvy markers. Starting with the lightest colors so you don't contaminate your markers, draw the light green marker over the surface of the leaf, touching here and there with the bright green color. Next, draw the olive green marker over the stamp, touching where the darker green areas would be on the leaf stem. Finally, use the darker purple marker to highlight the stem and base of each leaf.  If the ink looks as if it has dried a bit while adding colors, breathe directly on the stamp's rubber, huffing a bit so your breath re-moistens the ink. Stamp onto the glossy stock one or two times to get the graduated colors of the first and second stampings. Re-color your stamp with the markers and stamp again, as many times as you wish.
NOTE: Dye based markers work best with this technique, because they dry slower than do Copic's or Sharpie's.

The next layer on the card base is done with the Marvy Ink pads and a stipple brush. A stipple brush is a stiff bristled brush that is usually flat on the tip end, and is used to "pounce" the ink onto the card. They come in many sizes, from small (1/2 inch) to large (1 1/2 inch) in diameter. I like using the larger sizes because they cover the card base faster when stippling.  Stippling makes tiny dots  on the background if you hold the brush in an upright position when pouncing. Tap the brush on the ink pad several times as it picks up the ink, and then pounce on the paper, shadowing around the edges of the card, blending the colors you want to use.

I then inked and stamped several images on the library pocket, along with gluing several strips of patterned paper and ephemera to the pocket before attaching the metal tag with the dragonfly brad. I stippled a little more ink on the pocket, and then adhered the pocket to the front of the card with red-line double stick tape. The red-line double stick tape is preferred when adhering to the glossy card stock, for stronger hold.

When complete, you can adhere the glossy stock to a card base, or use the glossy stock as the card, the glossy finish is usually only on one side, the other side is a matte finish. I placed an Artist Trading Card in the library pocket, but you could also use the pocket to hold a gift card or handwritten note.  Many ask if the glossy card stock is a necessity?  If you look closely, you can see that the colors stamped on the glossy stock are much brighter and more vivid than the same colors stamped on the library pocket.

I hope you have enjoyed this technique, and will try it on a project soon. I enjoy using it on cards where bright colors are used, and hope the cards will brighten your day. Take care, and have a great week!
Mindy

Monday, June 24, 2013

Picture Perfect Garden Angel- Mixed Media Canvas


Hello fellow artists!  Today's post is a first for me. My first Canvas Mixed-Media Collage piece. I have been studying pieces by other artists, and finally decided to give it a try myself.
Most of the supplies for this canvas was from the June Nesting Components Mixed Media Kit from Paper Wings Productions. I also used one of my New stamps from the Julie Nutting Doll Stamp Collection from Prima, "Riley" is her name.  The angel wings stamp is also new from Prima, and works along with the Doll stamps.

The canvas is an 8" X 8" stretched canvas I purchased throught Oriental Trading Co. I didn't photograph the step-by-step tutorial, because it was my first canvas, and I wasn't sure how it was going to come out.  But now that I know what to expect, and the steps involved in creating a canvas like this, I will try to do a tutorial on the next one I do.

If you have any specific questions about this piece, you can leave  a comment here on the blog, or email me to ask your question. I will be happy to answer any questions you have.
Thank you for joining me here today. See you again soon.


Wednesday, May 15, 2013

Tea Time Birthday Greetings


Greetings fellow stampers! I hope you are all having a wonderful day. The card for today is celebrating two of my favorite vices, tea time & flowers. Here's how it came together.


I started with a kraft colored card base and added a vintage background paper print. As I was collecting all my components for this card, I found a small piece of embroidered rick-rack whose colors matched my components. I adhered a scrap band of pink and yellow polka dot printed paper to the bottom of the background paper, and then adhered the rick-rack on top of where it came together. I then adhered the entire background to the card front with double sided tape.  I usually forget to pre-plan this last step, and end up just gluing the ribbon on top of the card.  It looks better if you adhere the ribbon or lace first, because that way the ends are adhered underneath and there is no way for them to come loose or ravel out.

I then went about constructing the image embellishment. I had the tea cup with daisies from Inky Antics Stamps, stamped on white card stock with tuxedo black Memento ink and colored with Copic markers. I fussy cut around the stamped image and adhered it to an oval cut from kraft colored stock, and matted with a bright pink stock.(Razzleberry pink from My Favorite Things) The oval unit was cut with my Spellbinders Nestabilities Card Creator Set titled A2 Filigree Delight. I adhered the tea cup to it with foam mounting tape to give it dimension.

To give the card a little bling, I attached beautiful hot pink pearls below the rick-rack  trim, and mini hot pink acrylic stones to the centers of the daisies. The pearls and stones were from an embellishment pack from Prima.  To finish off the card, I stamped the Happy Birthday greeting on the polka dotted paper strip with black Archival Ink. This ink is a heavier ink, and always stamps dark on printed paper.

I hope you are having a wonderful Wednesday, and that you will join me again on Friday with a special post, that has been a long time in the making.  Take care, and see you again soon.

Mindy
Monday, April 29, 2013

#1 Mom Tag

Happy Monday fellow bloggers.  Today's tag celebrates Mother's Day, or any other special occassion where you want to celebrate your #1 Mom!

I started with one of Prima's large tags from julie Nutting and added a piece of one of the Firefly papers from the 6 X 6 pad. I also stamped a piece of white card stock with a background ATC (artist trading card) size stamp from Invoke Art, and adhered it to the tag with the scrapbook paper.  I stamped the Doll stamp, Girl with pocket dress from Prima, and the Girl with strapless dress and crown (also from Prima) on white card stock with tuxedo black ink from Memento so I could color them in with my Copic Markers. I then cut out both dolls to use on my tag. The Doll with the strapless dress and crown was used in the cream colored resin frame embellishment from Websters Pages. I also added some color to the frame with my Copic markers, before adhering the unit to the tag with Ranger Glossy Accents.

The Doll with the pocket dress was adhered to the tag with foam tape to give it more dimension. I used Pan Pastels in violet to shade around the doll to make a shadow on the tag. I then stamped a tendril stem on to the tag and glued a dimensional Mini Daisy flower made from the Susan's Garden Collection of dies from Sizzix. I am a big fan of Susan Tierney-Cockburn who designed this line of flower making dies for Sizzix.  About 6+ years ago I took some classes from Susan when she was promoting paper punches she designed for the Punch Bunch, and I have been a been a big fan, and have taught several classes of flower making using those punches. I am so glad she decided to design the thin dies, because those punches get a little heavy when you lug them around to classes.

To finish off this tag, I stamped the #1 Mom stamp from Fiskars at the top of the tag and added another strip of the stamped paper to the top of the tag to cover the hole. You could now use this tag to decorate the cover of a long card that fits a #10 size long envelope, or just use the tag as is for your card. There is plenty of room on the back to write any message you like. Please visit me again this week for more ideas for Mother's Day cards, and don't forget to leave a comment on my blog to be eligible to win a chance at my Blog-aversary Prize Package to be given away May 12, 2013. See you again soon.

Friday, January 25, 2013

Let's RODEO, Texas Style!

HOWDY Pardner's! The San Antonio Stock Show and Rodeo is just around the corner, Feb.7, 2013 is when it starts, and if you enjoy a good old fashioned rodeo with buckin' bronco's, and barrel racers, and goat ropers, then this is the place you need to be. San Antonio has one of the top ranked rodeo's in the USA, and every year it gets bigger and better! (I should work for the Rodeo Association.)

Today's card is titled Let's Rodeo! and features many Texas themed stamps from our own Texas based company, Deadbeat Designs. This very dimensional card is made from kraft card stock, and stamped with tuxedo black Memento Ink and Versamark Sepia Ink.The background papers are from My Minds Eye, and  I am not sure where the design of the foldout card came from, but was shared by a friend.  I dug through all of my Texas stamps by Deadbeat, and picked out stamps that fit the panels of the card, and that pertained to the happenings at the rodeo.

This shows the card laid out flat, I laid it on my scanner bed to take this picture, and so you could see all of the designs and stamps I used. When it is folded up to put in the envelope to mail, it looks like the picture at the top left of the post. If you would like a basic cutting guide for this card, post a comment on this blog and your contact info, and I will get one to you as soon as possible.
Here is an image of the pop-out card that I took, to try and show the folds and layers, of how it looks when it is opened. I'm sorry it came out so blurry, but maybe you get the idea. I hope you all have a nice weekend, and create something beautiful with your Art!

Friday, January 18, 2013

Valentine Inchie Card


Hello Everyone! Today's Valentine Special Card is one made with Inchies. If you don't know what inchies are, or haven't heard of them before, stick around and I will give you a little history of them.

Inchies are 1" X 1" tiny works of Art! They can be hand stamped, hand drawn, painted, etched, embossed, any type of  artistic medium can be used and any art technique.  Mine are stamped and mixed-media today, and I used them on an A2 card, with a Valentine or Love theme. To begin, I covered a base card with a sheet of 6 X 6 printed paper from the "Ruby" paper pad from My Mind's Eye. Since it was printed with tiny hexagons, I cut out around the little shapes to give the paper a detailed edging.  I then cut out 6 each one inch squares of white card stock, and 6 each squares of red card stock to give each one a small border. I used various stamps with Love Letter Red Memento ink that were a heart or love theme, such as the Wedding Couple, and Love Bird from AMuse Artstamps, along with a single daisy stamp and LOVE square from my stash. The square on the bottom right I covered in red heart washi tape and then glued a tiny wooden heart from Artchix Studios on top.  The sentiment "Happy Valentine's Day!" was stamped in Tuxedo black Memento ink and then I centered it on a banner from the Bannerific clear stamp set from Lawn Fawn.  I also raised two of the squares with a foam dot to give the card texture, along with the banner to make the whole card POP!  In addition to the tiny stones in the daisy centers for bling, I also added a sheer red ribbon up top on the fold of the card.

When I am stuck for inspiration when making a card or art project, I sit down at my stamping table and play with my stamps. Sometimes I color the images, and sometimes I leave them plain. If the image happens to be larger than 1",  you can then punch out 1" squares of the design or use your paper cutter to cut the image into 1" X 1" squares. Usually the inchies are matted with a solid color background before they are used on a project. However, if you separate a larger image into the inch squares, you don't need a background before reassembling them on your card or project. You just assemble them like a mosaic, and leave a small border around each piece.

So, know you know about inchies!  Why not try stamping some out this weekend and make a unique design with them. You will soon be collecting  lots of little inchies to use in your art projects and cards.
Keep a bowl full on your desk for that next special card or tag. You will LOVE them!  See you again soon.


Thursday, December 13, 2012

Need a Little Pick-up?

Greetings Friends,
Christmas is just a little less than two weeks away, and who doesn't "need a little pick-up" at this time?  As I was rummaging through some of my stamps, I found this pick-up truck from Deadbeat Designs, and thought wouldn't that make a great card during all this Christmas frenzy.

I want to mention first of all, that this card is not finished!  It is still a work in progress.  I started out by making a trifold card from a sheet of heavy printed scrapbook paper. I stamped out the truck on white card stock, colored it with my copic markers and glitter pen, then fussy cut it out to adhere it to the front of the card, right on the edge. You can see the edge going down through the windshield. I left a little tab at the bottom for the phrase, also from Deadbeat Designs.
When you open the front flap of the card, you see the second page, where I have placed a Hero Arts  house, stamped on watercolor paper with StazOn ink and colored with my Inktense watercolor pencils. I then cut it out, and glued it to the far left of the card so it wouldn't show from the front. I also punched a cute little butterfly to put in the "sky" area.

Then as you open the last flap of the card, I added an area where I can stamp a sentiment, or hand write a personal message. Below this area, I added a flower and leaf cluster that I had in my copic coloring "goody box".  One of those items I was practicing coloring on, and when finished just stuck it in the envelope and never wrote down the stamp name or who it was from.   I need to add a little more detail to the front and second page of the card, maybe some trees or mountains, or maybe a cactus or two since I am in Texas.  If you have any suggestions, comment on this post and let me know what you think it needs.  I sit down and piddle with it while I am watching TV in the evenings, between Christmas chores and decorating.
I have also been working on my Christmas cards, and almost have them completed. I hope to complete them this weekend, so I can get them into the mail, and post the finished product on this blog.

I hope you all have a wonderful weekend, and that you enjoy all of the happenings of the season. See you again, soon.

Thursday, November 29, 2012

Thank You's are Important, Too


Thank you's are important, too!

During the holidays, there are two little words that mean so much, and are sometimes forgotten. "Thank You!" Thank you for the lovely dinner, thank you for inviting me, thank you for the wonderful gift, thank you for thinking of me. Sometimes we get so tied up in the moment, we forget to say these words out loud. That is when a beautiful card can really come in handy.  So while you are creating beautiful handmade cards to send to family and friends, be sure to also make several thank you cards, to keep on hand for the thank you's that are frequently forgotten.

The card I made today is an A2 size card that is very simple, yet beautiful. I started with the background pool colored layering paper from Hero Arts and added a printed scrap across the bottom, about halfway across. I then adheared a ribbon across and glued it to the back. I then shadow stamped a leaf design on the solid top with a gray Marvy marker inked directly onto the stamp. This technique is so vibrant on glossy surfaces, yet a soft matte finish on non-glossy papers. I also used this technique to stamp a thank you stamp on a precut chipboard label. It's finish was fairly glossy, so it turned out vibrant and strong. I just take the Marvy marker (light blue for example) and mark directly on the word thank on my rubber stamp.(Always use the lighter color first) Then with my grape colored purple marker, I rubbed it on the word "you" and across the bottom of the word "thank". It automatically blended the two colors where they overlapped. You can then "huff" or breathe heavily on your stamp and stamp it onto the smooth surface.  Your breath will re-moisten the inks just enough so they will stamp easily. Use foam dots to pop the label on the front of your card, and then adhear the front panel to the card front, and you are done!

Here are the last four tags from the Holiday Tag project I completed. This project was one of the most rewarding projects I have seen to fruition, so I guess that is why it means so much to me.  I hope you all enjoyed seeing the tags as much as I enjoyed making them. Several of you left me comments on the post, and I really appreciate your responses.

I hope you consider making a few tags this year for attaching to special gifts, or even attaching to the front of a greeting card.  They are fun and can be quick to make and they will be treasured by those receiving them. Have a grand week, and I will see you again soon.

Wednesday, November 14, 2012

More Tags on Thursday!

Hello everyone!
It must look like I am posting the same things over and over every day.  But I'm not! Here are three more tags for the Holiday Tree that I am helping to decorate.

I finally started playing
with my Christmas stamps, and hope to find a theme to use as my Christmas cards this year. Every year I play around with my stamps, weeks in advance, trying out different stamps and designs in effort to find something I can live with for the holidays on my cards.

I see so many different designs online from all the blogs I frequent, that I get so confused I don't know which ones I like the most.  This year since I will be making these tags in advance of the holidays, maybe I will find one grouping that I will love to send out as cards to my relatives and friends for the holidays. I have completed half of the tags needed from me, and hope I will be able to really buckle down this weekend to get the rest done, so I can deliver them early next week.

While looking through my millions of stamps today, I found many Christmas stamps I haven't stamped in ages, if ever!  You know they always say, ". . . the one with the most toys, wins!"  When it comes to stamps, "I WIN!"

Have a great day doing whatever your heart desires, and take time to stop and smell the Roses!

Monday, November 12, 2012

Tags on Tuesday!

Hello friends,
Three more tags for the Holiday Tree we are decorating.  I really am enjoying making these tags. I can try new techniques, and use a lot of my copic colored images that I have stamped out and colored. I have a whole booklet of images I have stamped and colored while learning to use the copic markers. I save them, and then when I need a small image to use in one of my art pieces, I can just add it in without a problem. Many of the images I color in different color schemes, that way I have a variety to choose from in my booklet.  As you can probably see, I love coloring roses of all shapes and sizes.
I love to practice the shading on the petals, and trying color combinations that might occur in real life gardens. The rose stamp on the first tag on the left, is my favorite rose stamp, and I don't know how many times I have stamped it out to color.

This is a great project to use my sample snippets on, I can combine several on a tag. I don't have too many Christmas samples in my book, but guess I will have to start stamping out a few so some of my tags will have a Christmas holiday theme.
There is not too much technique in putting together these tags, but if you have any questions, feel free to comment on this post, and I will get back to you as soon as possible with the answers.

Have a good week, and keep on stamping!

Thursday, October 4, 2012

Steampunk Luc at Halloween!

Hello friends,
Halloween is about a month away, and I love decorating and dressing up for the holiday. I have been lucky, the 30+ years I have been working, the other employees and I have always worn costumes for Halloween. I have worked retail sales, and every Halloween we would dress in costume, and customers would come in just to see our costumes.  Of course, by the time I got off work and headed home, I was ready to rip off the costume and wipe off the make-up. After my bath it was into my jammies and off to read or watch TV.  Especially in my later years, there were no trick-or-treaters in my neighborhood to hand out candy to.


This card was made with papers from the Graphic 45 Halloween collection, bits and pieces of ribbon, and the Luc stamp from Paper Wings Productions.  I also found a breastplate "costume" for Luc in the Graphic 45 Steampunk Debutant paper collection that fit him just fine.   I also stamped three pumpkins on a tag, colored them in with Copics, and made one to look like a carved Halloween pumpkin.  Then the embellishments were just adhered to the card in different layers with foam tape, some popped up, and others not, so it wouldn't be so flat. Then glitter and gemstones made it sparkly and blingy to boot!  I have a few more Halloween type cards started, and will post in a few days if I get them done this weekend.

The weather is predicted to "cool off" this weekend, with a cold front on Sunday.  I wish it would cool off some, I am ready for me some winter!  Not slushy, snowy winter, just temperatures a lot cooler than 90 degrees!  See you again soon.

Thursday, September 20, 2012

Two Projects to Share

 Hello friends,
I have two projects to share with you today. The first is an Artist Trading Card that I made for a special friend. She is always been one for adventure, and she is about to embark on another great one. So I made this tiny 21/2" X 31/2"  decorated pocket with card to send her, and she can even take it with her if she likes.
I started out with a 3" X 7" piece of printed scrap book paper, and folded it to within 1" of the top and stapled it with my tiny attacher by Tim Holtz.  I punched the top corners with a corner decorative punch, and stamped a beautiful butterfly stamp on a scrap of stock, colored it with copic markers, cut it out, used Stickles glitter to glam it up, then let it dry and cut it out!  I then attached the butterfly to the pocket with foam tape to make it pop out just a bit.


To make the card, I spritzed the background  (21/2" X 31/2") with Dylusions spray from Ranger, in several colors to really make it colorful. Then I attached the card which is a print itself from the Travel Travelogue paper collection from Graphic 45 papers.  It just slips in the little pocket for a greeting-to-go! You can also write a special message on the pocket front, or on the back of the ATC card like I did.  Janice, have a nice Trip!
The second project for today is a greeting card made from a deco arts mannequin stamp that I just love. I stamped it out on white card stock with black memento ink. The base stand of the mannequin was too large for the front of the card, so I just cut it off and stamped out a flat daisy to use as the base. All of the coloring was done with Copic markers and I accented the center of the flower and the star on her chest with Sepia crystal accents, just to give it a little texture. I found a lovely tiny rose print scrap book paper for the background, and stamped the cancellation stamp from the Tropical Travelogue Stamp Set from Graphic 45 in the empty space. It needed just a touch more to complete the card, so I added a ribbon with knot lengthwise around the card.
I love the phrase on her skirt that says; "Nothing is more important than this day!" So go out there and make it a good one.  See you again soon.

Friday, September 7, 2012

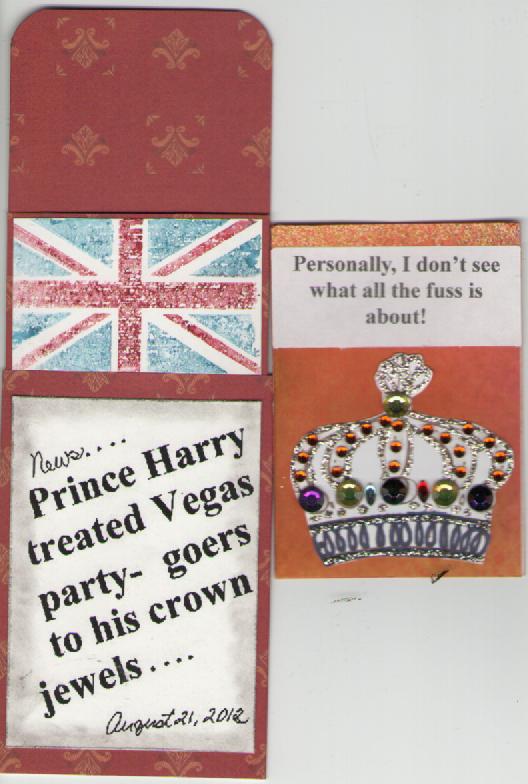
CROWN JEWELS theme ATC's for September


The second theme for the September ATC trade was Crown Jewels. Since there was so much in the press about Prince Harry's escapades while he was in Las Vegas recently, I decided to do a spoof of the headline on my Artist Trading Card.

On the front, I printed off the headline on a piece of white stock, and  inked the edges with black soot chalk. This was an outer pocket. Then on the inner pocket that slides out, I stamped the English flag stamp on white stock, inking the stamp with the fired brick and faded denim Distress Markers by Tim Holtz.

On the inner most card I printed a sticker that read, "personally I don't see what all the fuss is about!" and stamped an image of a large crown and embellished it with stick-on gemstones and lots of stickles to make it really sparkly!
It really caused a chuckle at the trading card meeting. Everyone broke out in laughter, and I was so surprised, it really made my day!

I guess they were expecting something else????????????
Have a wonderful day, and a great weekend. This only goes to show you that a little thing like this card can cause  laughter, which in many ways is considered the best medicine.


Friday, August 10, 2012

With Love & Caring . . . . . to You!

Hello Everyone! Happy Friday! It's the start of another hot and steamy weekend here in South Texas. I am attending a card making class midday on Saturday, so I am sitting here on Friday planning what I need to accomplish between now and the beginning of the new week.

The temps are suppose to feel like 104 Saturday and Sunday, so I think I will just stay in the cool house and work on some greeting cards, and possibly try some background inking techniques for my Artist Trading Cards next month.

I am showing a card I made to send to a good friend who is having health problems right now. She is a very loving and caring person, and I want her to know exactly how I feel. This card is made with a Daisy filled tea cup stamp from Inky Antics, a little Mouser stamp from Impression Obsession, and a piece of patterned paper. The stamps were stamped with Tuxedo Black Memento ink, and then colored with copic markers. I then cut them out and adhered them to the printed scrapbook paper before attaching it to the card base. I used a foam square to pop up the little mouse for accent.

The card itself was very easy to make, and I wanted to share it with you, so you could see how even the simplest of cards can let someone know how much you care for them, and that you took the time to make it with your own two hands.

Have a wonderful weekend, and take a few moments to let someone you love know how special they are. See you soon!