Here is my namesake, one of the New Julie Nutting Doll stamps from Prima, may I introduce "Mindy". And although I am not as physically proportioned as she, I bonded with her immediately, and felt a connection like no other.
All of the products used on this tag, are New releases. The tag is from the Prima Hancock Park Tag Pad, the large fabric flower from the Prima La Tela Collection, and the tiny sparkly Dazzles flowers from the Tiny Flower Stickers pack from Hot Off the Press.
I colored Mindy's dress and hair with my copic markers, and added sparkle with corresponding Wink of Stella markers. The washi tape was added at the bottom of the tag, with the Dazzles flowers attached in various empty spots on the tag. I colored the Prima fabric flower with Lindy's Stamp Gang Desert Moon Purple Sage Glitz Spritz before attaching to the tag with Fabri-Tac adhesive. The doll stamped image and framed verse were popped up with foam tape to give dimension, and the sage colored bow was attached with a pop dot.
I love how this doll image has "attitude" and a certain shyness, just like ME! The framed sentiment I used on this tag says, "Run mad as often as you choose, but do not faint!" I don't know who Julie had in mind when she named this doll stamp, but I will always "imagine it was me" as long as I live, and will enjoy stamping with her for years to come.
I hope you all have a wonderful weekend, and enjoy your time with family and friends.Spring is almost here, and very soon we will be complaining of the heat of Summer. At least we can dream, can't we?
Greeting Cards and Art Projects made with rubber stamps, die-cuts, or paints.
Showing posts with label tags. Show all posts
Friday, February 28, 2014
Saturday, February 22, 2014
Cowgirl Becky
Hello friends! I wasn't sure I would get this tag posted before our Stock Show and Rodeo closed this weekend. February has been a crazy month for me, with the cold, cold weather, holidays, and an unexpected death in the family, I haven't been able to post any goodies this month. I have been working on a few, but time just seems to slip away from me before I get them posted. Hopefully, I am back on track, and it will be much easier to post projects and card ideas in the future.
Today's card is a tag front using one of the New Julie Nutting Doll Stamps from Prima. I love, love, love these doll stamps, and "Becky" (the cowgirl) really spoke to me! Ha Ha, I made a funny. . . . "spoke" . . . . . wagon wheel. . . . . Yee Ha! The wagon wheel stamp is a new one from Deep Red Clingstamps, made in the USA. Living here in Texas, I love all types of stamps that portray western life. I also picked up a wonderful clear set from My Favorite Things, called "Howdy"! From this set, I used the star circle with dots as a hub cap for the wagon wheel, and the lasso rope that "Becky" is holding. The tiny random stars are a stamp from Deadbeat Designs, and the large word "hello" is from Winnie & Walter. The background tag is one of the New tags from Prima, the Aquarelle Tag Pad which consists of beautiful pastel colors.
The Large Tag Pads from Prima are so wonderful, not only are they large enough to highlight the Julie Nutting Doll Stamps, they also give you lots of room for other mixed-media techniques. The other New Julie Nutting stamp I recently purchased is the doll stamp called "Mindy". Of course, you may notice the connection of why I had to purchase that one, because my name is Mindy, and I will highlight her on a new tag early this coming week.
With the San Antonio Stock Show and Rodeo coming to a close this weekend here at home, and the Winter Olympic Games closing also, I will probably be glued to the TV a few more days. (I also love the winter Olympic sports!) We have also been forewarned there is another Arctic Front moving south from the North Pole, that should arrive here in So. Texas midweek. So, I have a few more outdoor projects to tend to before the cold weather hits us again. Stay warm and safe, and have a pleasant rest of the weekend. I will visit with you again soon.
Mindy
Today's card is a tag front using one of the New Julie Nutting Doll Stamps from Prima. I love, love, love these doll stamps, and "Becky" (the cowgirl) really spoke to me! Ha Ha, I made a funny. . . . "spoke" . . . . . wagon wheel. . . . . Yee Ha! The wagon wheel stamp is a new one from Deep Red Clingstamps, made in the USA. Living here in Texas, I love all types of stamps that portray western life. I also picked up a wonderful clear set from My Favorite Things, called "Howdy"! From this set, I used the star circle with dots as a hub cap for the wagon wheel, and the lasso rope that "Becky" is holding. The tiny random stars are a stamp from Deadbeat Designs, and the large word "hello" is from Winnie & Walter. The background tag is one of the New tags from Prima, the Aquarelle Tag Pad which consists of beautiful pastel colors.
The Large Tag Pads from Prima are so wonderful, not only are they large enough to highlight the Julie Nutting Doll Stamps, they also give you lots of room for other mixed-media techniques. The other New Julie Nutting stamp I recently purchased is the doll stamp called "Mindy". Of course, you may notice the connection of why I had to purchase that one, because my name is Mindy, and I will highlight her on a new tag early this coming week.
With the San Antonio Stock Show and Rodeo coming to a close this weekend here at home, and the Winter Olympic Games closing also, I will probably be glued to the TV a few more days. (I also love the winter Olympic sports!) We have also been forewarned there is another Arctic Front moving south from the North Pole, that should arrive here in So. Texas midweek. So, I have a few more outdoor projects to tend to before the cold weather hits us again. Stay warm and safe, and have a pleasant rest of the weekend. I will visit with you again soon.
Mindy
Saturday, November 16, 2013
A Few More Thelma Tags
I finished a few more tags with the "Thelma" stamp my friend Mark Jetton at Deadbeat Design Stamps sent me. He also promoted my blog on his post yesterday, so I thought if someone came looking for his link I would have more than the one little tag I posted yesterday. Thelma is so much fun to stamp, color, and even paper piece!
I have been adding scraps of scrapbook paper to tags for backgrounds for several weeks now. If you viewed my blog last year before Christmas, you saw the tags I made to decorate a Christmas tree for our church group. This year I am doing something different with the church group, but we haven't quite decided yet what it will be. I do, however, like to have some tags prepared for decorating, "just in case I need them!" Since many of Mark's stamps are Texas themed, I thought I would use another themed set by Paper Wings Productions (also Texas based) for the Texas sayings. These were from the Texas Quotes set.
I hope everyone is having a wonderful weekend, preparing for Thanksgiving which is not too far away. These tags also make wonderful place cards for your Thanksgiving table. So why not make up a batch to decorate your table, "and let your creative juices flow!" See you soon.
Mindy
I have been adding scraps of scrapbook paper to tags for backgrounds for several weeks now. If you viewed my blog last year before Christmas, you saw the tags I made to decorate a Christmas tree for our church group. This year I am doing something different with the church group, but we haven't quite decided yet what it will be. I do, however, like to have some tags prepared for decorating, "just in case I need them!" Since many of Mark's stamps are Texas themed, I thought I would use another themed set by Paper Wings Productions (also Texas based) for the Texas sayings. These were from the Texas Quotes set.
I hope everyone is having a wonderful weekend, preparing for Thanksgiving which is not too far away. These tags also make wonderful place cards for your Thanksgiving table. So why not make up a batch to decorate your table, "and let your creative juices flow!" See you soon.
Mindy
Tuesday, September 24, 2013
Tag Shaped Birthday Card
Welcome friends, to my blog today. I have a few birthday's coming up in the next week or so, am I am eagerly trying out some of my new products, before using them for Christmas projects.
I purchased one more of the Prima Doll Stamps, one that I didn't have before, so I stamped her out and colored her with my PanPastel Artist Chalks. I also used a piece of clip art from my Paper Wings Productions September Nesting Components Kit, and used the packaging tape transfer technique to add it to the front of my card with a frame. The clip art images from Paper Wings are laser printed on a heavy weight paper. You cover the front of the image with clear packaging tape, and trim around the edges. Burnish well, so that there are no air bubbles in the tape. Soak the image in a shallow bowl of water, until the paper backing is well moistened. Remove the image from the water, and on a paper towel, rub the paper backing off with your fingers. The ink will adhere to the packaging tape, and you will be able to apply it to another background with a print or with a different color. I stamped one of Donna Salazar's frames on the front of my tag with Distress inks, and then cut out the interior of the frame. I then mounted my transfer on a piece of double sided scrapbook paper, and attached it to the inside of my card. I then stamped Happy Birthday, Best Wishes, and Just for you on the front panel under the frame. I had several swatches of watercolor paper on my desk where I tried out many of my Tattered Angels Glimmer Mists. I punched out 5/8" squares that matched the colors in the framed image and my Prima Doll's dress, and pop dotted them to the bottom of the card. This front flap is one of the printed tags from Prima, so it has a faint design of hand writing on the background.
The back flap of the card is one of the #8 manilla tags from Tim Holtz, gessoed on the interior. This made it easier for me to write my birthday greeting on, because it gave the card some tooth. This makes a very different style of card that fits into a #10 business style envelope. I have many of these envelopes that I hardly ever use, so since I designed this style of card to fit these envelopes.
I hope you have gotten some ideas that you can try for some fall type cards for this coming season. I hope the weather in your part of the world is favorable now, here where I live it is fall, yet the high temperature is still 98 degrees today! Have a great Wednesday, and I will visit with you again soon.
Mindy
Sunday, September 15, 2013
Maiden of the Sea
Today's tag background is created using the Lagoon Color Paint System from Tattered Angels. It coordinates with many of the Prima Marketing products. I love the colors included in this set, especially since my go-to colors have been turquoise and aquas lately. The products included in this Paint System Kit are:
1. Glimmer Mist: Apricot Nectar- adds a chalk-matte finish with a fine glimmer; 2. Glimmer Mist: Bahama Blue- a watercolor mist with a touch of glimmer; 3. Glimmer Glam: Golden Goddess- a paint with a fine glimmer, plus glitter; and 4. Glimmer Glaze: Pewter- a paint with a fine glimmery sparkle. I used this Paint System to spray one of the large Prima printed tags, and then left it to air dry. When the tag was dry, I cut out three of the elements from the Paper Wings Productions August Nesting Components Kit and layered them with some of the lace included in the August Kit. I gathered the lace gently and adhered it to the back of the photo, and then adhered it to the top of the flourish print, overlapping it slightly. After adhering it to the tag, I used foam tape to adhere the clock face to the top right corner of the tag. I found some beaded trim in my stash that had small metal coins attached, and thought that it would coordinate with the water colors of the background. I used red line double stick adhesive to attach it to the bottom of the tag, and then used more embellishments from the August Nesting Components Kit to complete my tag. The pearls and ribbon just added a bit of bling to the composition.
Since I covered most of the tag with embellishment, I decided to take a picture of the tag after I sprayed the layers of color from the Lagoon Paint System package. You can see from the picture how wonderfully the colors blend and compliment each other, so that if you are new to spray coloring or have trouble coordinating your colors, like I do, these pre-packaged Paint Systems are just what you need to help you get started. After a while, you will learn which colors go well together, so you can make your own color combinations to use on your art projects.
I hope you have enjoyed this project with me, and that you will join me next time for two projects using the Daily Junque and Soiree Paint Systems from Tattered Angels. Until then, have a great weekend.
Mindy
Friday, September 13, 2013
Be Wise, Kind, and True Fall Tag
Happy Friday, friends. Today's post is another tag using the Witch's Brew Paint System from Tattered Angels.
I started out by using one of the Prima Tags as my background, and I stamped the Owl Panel Clear Stamp from Paper Wings Productions on the tag with Rich Cocoa Memento ink. I also stamped the single flying owl and word stamp from the same set. I then spritzed the entire tag with Pumpkin Spice Glimmer Mist, and let it dry. When dry, I colored the image with my Wink of Stella Glitter markers from Kuretake and let them dry also.
To add a little shadow, I drew around the entire tag edges with my Licorice Black Gelato from Faber-Castell. If you are not familiar with Gelatos, they are a chap-stick like crayon coloring tool that can be used with a sponge or even your finger to blend color on your project. I used my finger to blend the dark color around the edges and around the words, "Be Wise, Be Kind, Be True!"
I also punched a small black cat from black card stock and the Cats Galore die from Impression Obsession. I used flowers and leaves from Prima Marketing and the September Nesting Components Kit from Paper Wings Productions, matching the color scheme used to color the stamp, also included in the September Kit.
Paper Wings Productions creates these Nesting Component Kits on a monthly basis, and sells them in their online store. Click HERE to visit their web store and check out the wonderful stamps, kits, and supplies that they carry there!
I have really enjoyed bringing you these tags using the Witch's Brew Paint System. The next post will be using the Lagoon Colors Paint System that coordinates with several Prima Marketing products. See you then!
Wednesday, September 11, 2013
Tattered Angels Sprays - Witches Brew
Hello Everyone! This is the first post of my Paint System Spray Tutorials from Tattered Angels. The featured spray pack today is "Witches Brew"!
The Paint System Sets contain four distinctive mediums that perfectly compliment each other. I have used a large Manila tag as the base for this project.
Witch's Brew consists of:
1. Glimmer Mist Chalkboard Spray- Grape Ape
(a chalk-matte finish with a fine glimmer)
2. Glimmer Mist Spray - Pumpkin Spice
(a watercolor mist with a touch of glimmer)
3. Glimmer Glam - Stiletto
( a brush-on paint with a fine glimmer, plus glitter)
4. Glimmer Glaze- Wicked
(a brush-on paint with a fine glimmery sparkle)
To start, I applied a layer of Glimmer Glaze - Wicked around the edges of the tag. The glaze is shiny/glossy when dry and acts as a resist for the other sprays. When dry, I then sprayed on some of the Chalkboard Spray and some of the Glimmer Mist, to add the bright pumpkin and grape colors to the tag. Let the colors blend together, so don't be afraid to add lots of spray. If needed, you can blot a little of the spray with a paper towel in places. Again, let the sprays dry before preceding to the stamping. I then stamped my Impression Obsession stamp "Skulls About Town" with tuxedo black Memento Ink twice on the tag. Using some of the NEW Wink of Stella Brush Sparkle Pens in Yellow, Lt. Green, Dark Pink, Orange and Brown, I colored in the skull staffs. These new paint pens by Kuretake are very sparkly and add lots of shimmer with no mess! I then took a fan brush, and added some of the Stiletto Glimmer Glam paint to the top and bottom of my tag in streaks that look like old moss hanging on the walls of a cave. To add dimension, I stamped two bats from my Martha Stewart Halloween Icon Stamp Set and colored them in with the Wink of Stella dk, pink and clear glimmer pens to add sparkle. I used foam squares to adhere them to the tag. I also added a Prima Doll stamped on a Prima Tag, dressed in her "Batty Costume"to the bottom of the tag. To complete the tag, I added a swatch of twinkly red tulle ribbon tied in a bow at the top!
I hope you enjoyed the process of decorating this tag. The combination of colors with the Paint System were so helpful when decorating the background for this tag. Periodically I have problems deciding which colors to use together, so with this system I can learn more about combining complimentary colors. I hope you will try some also, if you have regrets of colors you choose. If you have any questions about the products I have used, feel free to write me, and I will try to help in any way possible.
Thanks for joining me today.
Friday, July 12, 2013
I Love You, Prima Dolls -
By now you have probably seen where I am participating in a Prima doll Blog Hop starting August 6, 2013. It is going to be so much FUN, I can hardly wait! I have never really loved a special set of stamps like these Prima Doll Stamps from Julie Nutting's designs, and it all goes back to my love of dolls and paper dolls when I was younger. My dolls were my playmates, and I loved making clothes for them and my paper dolls.
For this tag, I started by covering the Prima Doll Tag with patterned paper from the Botanical Paper Collection from Paper Wishes. The colors in this print are so rich and jewel-like I knew that it would be gorgeous with the Doll in the strapless dress. I stamped the doll on white card stock and colored her with my Copic Markers. After fussy cutting, I adhered the image to the front of the tag and added a 3-D bow at her waist. I used a rub-on for the message "I love you" on the top right hand corner, and added two strips of printed ribbon across the bottom 2/3 of the card. I also added some "bling" using tiny acrylic stones to the top of the tag, and as accents at her neck and ankles. Next, I stamped a flower using a waterbased marker to ink my stamp then stamped it on watercolor paper. I used my waterbrush to blend the colors of the flower, cut it out, and added it to my tag between the layers of ribbon. To complete the tag, I added Mermaid Glitz Stickles to the center of the flower, and a strip of ruffled ribbon to the bottom of the tag.
Before I close today, I just wanted to let you know that there will be more information coming on the Prima Doll Blog Hop in the weeks ahead. Be sure to tell your friends about the hop, and invite them to check out the posts, especially if they enjoy dolls, stamping, and paper arts. See you again soon.
Mindy
Wednesday, July 3, 2013
Card Full of Dreams
Today's card represents a "Card Full of Dreams". A friend of mine has always dreamed of owning his own business. When I found this package of stickers that I had purchased back in my "scrapbooking days", I figured now was a good time to send him a little encouragement about his "field of Dreams."
To start with, I took a sheet of 12 X 12 scrap book paper from the PinkPaislee Portfolio line of papers, and cut a 4 1/2" X 11" strip of paper for my A2 (4 1/2X 5 1/2) size card background. After folding it in half, lengthwise, as I mentioned before, found this package of Vintage Peel & Stick Labels that I had purchased back in the days when I was making scrapbooks. The label was from the vintage Country Company Collection from Melissa Frances, and was a picture of a storefront named the Porter Bakery. I hunted through my pages of printed vintage photos and came across a piece of a photo, a small boy standing in a doorway, that fit perfectly in the doorway of the bakery. After gluing the photo into the doorway, I cut out three numbers from a scrap of scrapbook paper and adhered them to the awning of the bakery.
To finish off the front of the card, I added a strip of polka dot ribbon with a scrap tied in a knot, and then added a key tag to the knot with the word "Dream" punched out of paper and attached to the tag.
To start with, I took a sheet of 12 X 12 scrap book paper from the PinkPaislee Portfolio line of papers, and cut a 4 1/2" X 11" strip of paper for my A2 (4 1/2X 5 1/2) size card background. After folding it in half, lengthwise, as I mentioned before, found this package of Vintage Peel & Stick Labels that I had purchased back in the days when I was making scrapbooks. The label was from the vintage Country Company Collection from Melissa Frances, and was a picture of a storefront named the Porter Bakery. I hunted through my pages of printed vintage photos and came across a piece of a photo, a small boy standing in a doorway, that fit perfectly in the doorway of the bakery. After gluing the photo into the doorway, I cut out three numbers from a scrap of scrapbook paper and adhered them to the awning of the bakery.
To finish off the front of the card, I added a strip of polka dot ribbon with a scrap tied in a knot, and then added a key tag to the knot with the word "Dream" punched out of paper and attached to the tag.
I hope you have enjoyed this very simple and quick card that can be used to remind a friend to "Follow their Dreams". Without dreams there would be nothing to look forward to in our lives. Have a Great Day!
Mindy
Tuesday, June 25, 2013
I LOVE IT!
I Love It, I do! I am busy playing with my New Julie Nutting Doll Stamps from Prima, and I really love this recent release. This card uses "Phoebe", and I have her set in a botanical setting with flowers from the Botanical Cartridge from Cricut.
I love stamping the doll stamps on the Tag Pad, also from Prima and Julie Nutting. This gives them an antique beige coloring with a lightly printed word background. Of course, I color the skin with my earthtone Copic Markers, in various shades of skintones, and either color in the clothing or paper piece it, to give the design more interest. On this card I stamped the skirt on a scrap of printed paper, and the blouse on white cardstock so I could color it in to match the green colors in my sentiment block and the twine.
I cut the daisies from the Botanicals cartridge with my Cricut machine, from ivory cardstock and glued it to the background paper from the Engraver 6 X 6 paper pad by Prima. I glued all of the elements to the cardbase with my Tombow Multi Mono liquid glue, and then used foam squares to adhere the skirt and blouse to Phoebe. To finish off the card, I added teensy half-pearls to the buttons on her blouse, and gold paint marker to the centers of the daisies, then tied a loopy bow from Limeade lawn clippings twine from Lawn Fawn and glued it to the stems of the daisies.
This card could be used for many occassions. I hope you have enjoyed this card.
I am entering it in the DL Art- Thankful Thursday June Linky Challenge- "Anything Goes". Stop by to see more wonderful card ideas submitted this month. Until next time,
Mindy
I love stamping the doll stamps on the Tag Pad, also from Prima and Julie Nutting. This gives them an antique beige coloring with a lightly printed word background. Of course, I color the skin with my earthtone Copic Markers, in various shades of skintones, and either color in the clothing or paper piece it, to give the design more interest. On this card I stamped the skirt on a scrap of printed paper, and the blouse on white cardstock so I could color it in to match the green colors in my sentiment block and the twine.
I cut the daisies from the Botanicals cartridge with my Cricut machine, from ivory cardstock and glued it to the background paper from the Engraver 6 X 6 paper pad by Prima. I glued all of the elements to the cardbase with my Tombow Multi Mono liquid glue, and then used foam squares to adhere the skirt and blouse to Phoebe. To finish off the card, I added teensy half-pearls to the buttons on her blouse, and gold paint marker to the centers of the daisies, then tied a loopy bow from Limeade lawn clippings twine from Lawn Fawn and glued it to the stems of the daisies.
This card could be used for many occassions. I hope you have enjoyed this card.
I am entering it in the DL Art- Thankful Thursday June Linky Challenge- "Anything Goes". Stop by to see more wonderful card ideas submitted this month. Until next time,
Mindy
Monday, June 24, 2013
Picture Perfect Garden Angel- Mixed Media Canvas
Hello fellow artists! Today's post is a first for me. My first Canvas Mixed-Media Collage piece. I have been studying pieces by other artists, and finally decided to give it a try myself.
Most of the supplies for this canvas was from the June Nesting Components Mixed Media Kit from Paper Wings Productions. I also used one of my New stamps from the Julie Nutting Doll Stamp Collection from Prima, "Riley" is her name. The angel wings stamp is also new from Prima, and works along with the Doll stamps.
The canvas is an 8" X 8" stretched canvas I purchased throught Oriental Trading Co. I didn't photograph the step-by-step tutorial, because it was my first canvas, and I wasn't sure how it was going to come out. But now that I know what to expect, and the steps involved in creating a canvas like this, I will try to do a tutorial on the next one I do.
If you have any specific questions about this piece, you can leave a comment here on the blog, or email me to ask your question. I will be happy to answer any questions you have.
Thank you for joining me here today. See you again soon.
Friday, May 31, 2013
A Pocket Book or Money Holder for Graduation
Hello Everyone! Hope you are having a wonderful week. Today's post and project is called a Pocket Book, but I have adapted it to be a Money Holder for a gentleman's Graduation gift. I'm not sure who the original creator of this mini pocket book is, but it has been around for awhile and I have seen different versions of it in Mini Book magazines and books. All I know is, it is fun and easy to make, and only uses one sheet of double sided 12 X 12 scrapbook paper.
I started out with pictures showing a smaller version, because I use my computer's scanner to scan my images. (I couldn't fit the 12 X 12 page on the scanner bed.)
1. Fold sheet in quarters; first fold in half, then fold each side to the middle.(you don't need to mark with white, I just did so on the dark side to show where to fold.)
2. Fold in 1/4" from left and right edges of the page. (I'm sorry you can't see the fold here, it is lost in the design of the paper.)
3. Fold each corner to the first fold line. DO NOT place over the fold! Up to the fold line ONLY! (do this on all four corners)
4. When your 1/4" edges and all corners are folded, fold each side into the center of the paper.
(on the next step I will be showing the full size 12 X 12 sheet.)
5. Flip the entire unit over and fold 1/2" down towards you from the top of the unit. You will notice that you have created two tiny corner pockets at the top of the fold. (in my picture they are black)
6. Bring the bottom of the unit to the top, folding the paper in half, and then tuck the bottom corners into those two little pockets at the top of the card. (in this picture you will see two diagonal pockets, one on the left and one on the right) If you have a bone folder or creasing tool, use it now to set all of the folds in the card.
7. Fold the unit in half and crease again with your bone folder or creasing tool. Now you have a pocket book with four pockets; one on the front, two inside, and one on the back.( I have placed a sheet of paper in the front pocket just to show you how big the pocket is.)
Now you can decorate the front with a graduation theme, as I did, or you can decorate it with any theme you wish. You can even leave it blank if you want to. I decorated mine with the Marcel stamp from Paper Wings Productions, stamping him on a sheet of Art Angel Element Deck Tags with Tuxedo black Memento ink and coloring him with my Copic Markers. I wanted to dress him in a black graduation gown, so I took my copic and drew the gown outline and then filled it in over the clothing of the stamp. I used the mortarboard hat from the Lawn Fawn "Hats Off to You" set and the sentiment "hat's off to you" from the Marcel set from Paper Wings. The hat was a little large, so I had to alter it a bit to fit his head. The sentiments inside on the various elements, are from the set "About New Beginnings" from My Favorite Things, and "Happiness Messages" from Hero Arts.
Thanks for stopping by today. I would appreciate any comments you would like to leave on this post. Have a great day, and I will see you again soon.
Mindy
Monday, May 13, 2013
Blog-aversary Give Away Winner
A giant Thank You! goes out to all my bloggie friends out there who stopped by and posted a comment on my blog during my One Year Blog-aversary Celebration this past week. The winning entry was randomly selected by the generator at Random.org and that winning entry is:
#16 Joanie, with your comment on "Good Things come in Small Packages".
Please email me at mindykSA@aol.com with your mailing address, so I can get your package out to you.
I also hope everyone out there had a wonderful Mother's Day. I spent the afternoon watching "My San Antonio Spurs" play basketball on T.V. while working in my art journal. Unfortunatly the team came up a little short today, but there is always the next game. They will be back in San Antonio for that one! Go Spurs Go!
OK, now on to the card of the day!
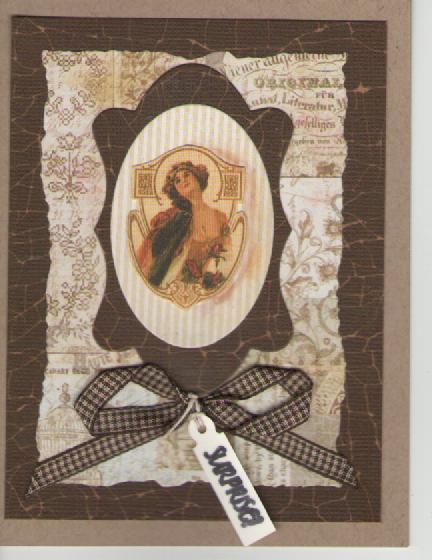
I started with a kraft colored card base and added a Crackle Core-card stock background from Tim Holtz and Co-ordinations papers. I then cut a printed card base from Prima printed stock and used my Spellbinders Nestabilities Card Creator, A2 size with Distressed Edges. On top of the printed stock I attached two die cuts from the Die-namics Well Worn Greetings die from My Favorite Things. The woman's picture was then cut from printed card stock and adhered to the oval die cut.
Below the dies, I tied a single loop bow from gingham brown ribbon and attached a small tag with the phrase "Surprise!" stamped on it and attached it to the bow with a piece of hemp twine and a knot. This card had so many layers, I decided it didn't need more dimension, other than the bow and tag. A very simple card, that turned out to have a very vintage feel.
Thanks again for stopping by, I hope everyone has a wonderful day!
#16 Joanie, with your comment on "Good Things come in Small Packages".
Please email me at mindykSA@aol.com with your mailing address, so I can get your package out to you.
I also hope everyone out there had a wonderful Mother's Day. I spent the afternoon watching "My San Antonio Spurs" play basketball on T.V. while working in my art journal. Unfortunatly the team came up a little short today, but there is always the next game. They will be back in San Antonio for that one! Go Spurs Go!
OK, now on to the card of the day!
I started with a kraft colored card base and added a Crackle Core-card stock background from Tim Holtz and Co-ordinations papers. I then cut a printed card base from Prima printed stock and used my Spellbinders Nestabilities Card Creator, A2 size with Distressed Edges. On top of the printed stock I attached two die cuts from the Die-namics Well Worn Greetings die from My Favorite Things. The woman's picture was then cut from printed card stock and adhered to the oval die cut.
Below the dies, I tied a single loop bow from gingham brown ribbon and attached a small tag with the phrase "Surprise!" stamped on it and attached it to the bow with a piece of hemp twine and a knot. This card had so many layers, I decided it didn't need more dimension, other than the bow and tag. A very simple card, that turned out to have a very vintage feel.
Thanks again for stopping by, I hope everyone has a wonderful day!
Monday, April 29, 2013
#1 Mom Tag
Happy Monday fellow bloggers. Today's tag celebrates Mother's Day, or any other special occassion where you want to celebrate your #1 Mom!
I started with one of Prima's large tags from julie Nutting and added a piece of one of the Firefly papers from the 6 X 6 pad. I also stamped a piece of white card stock with a background ATC (artist trading card) size stamp from Invoke Art, and adhered it to the tag with the scrapbook paper. I stamped the Doll stamp, Girl with pocket dress from Prima, and the Girl with strapless dress and crown (also from Prima) on white card stock with tuxedo black ink from Memento so I could color them in with my Copic Markers. I then cut out both dolls to use on my tag. The Doll with the strapless dress and crown was used in the cream colored resin frame embellishment from Websters Pages. I also added some color to the frame with my Copic markers, before adhering the unit to the tag with Ranger Glossy Accents.
The Doll with the pocket dress was adhered to the tag with foam tape to give it more dimension. I used Pan Pastels in violet to shade around the doll to make a shadow on the tag. I then stamped a tendril stem on to the tag and glued a dimensional Mini Daisy flower made from the Susan's Garden Collection of dies from Sizzix. I am a big fan of Susan Tierney-Cockburn who designed this line of flower making dies for Sizzix. About 6+ years ago I took some classes from Susan when she was promoting paper punches she designed for the Punch Bunch, and I have been a been a big fan, and have taught several classes of flower making using those punches. I am so glad she decided to design the thin dies, because those punches get a little heavy when you lug them around to classes.
To finish off this tag, I stamped the #1 Mom stamp from Fiskars at the top of the tag and added another strip of the stamped paper to the top of the tag to cover the hole. You could now use this tag to decorate the cover of a long card that fits a #10 size long envelope, or just use the tag as is for your card. There is plenty of room on the back to write any message you like. Please visit me again this week for more ideas for Mother's Day cards, and don't forget to leave a comment on my blog to be eligible to win a chance at my Blog-aversary Prize Package to be given away May 12, 2013. See you again soon.
I started with one of Prima's large tags from julie Nutting and added a piece of one of the Firefly papers from the 6 X 6 pad. I also stamped a piece of white card stock with a background ATC (artist trading card) size stamp from Invoke Art, and adhered it to the tag with the scrapbook paper. I stamped the Doll stamp, Girl with pocket dress from Prima, and the Girl with strapless dress and crown (also from Prima) on white card stock with tuxedo black ink from Memento so I could color them in with my Copic Markers. I then cut out both dolls to use on my tag. The Doll with the strapless dress and crown was used in the cream colored resin frame embellishment from Websters Pages. I also added some color to the frame with my Copic markers, before adhering the unit to the tag with Ranger Glossy Accents.
The Doll with the pocket dress was adhered to the tag with foam tape to give it more dimension. I used Pan Pastels in violet to shade around the doll to make a shadow on the tag. I then stamped a tendril stem on to the tag and glued a dimensional Mini Daisy flower made from the Susan's Garden Collection of dies from Sizzix. I am a big fan of Susan Tierney-Cockburn who designed this line of flower making dies for Sizzix. About 6+ years ago I took some classes from Susan when she was promoting paper punches she designed for the Punch Bunch, and I have been a been a big fan, and have taught several classes of flower making using those punches. I am so glad she decided to design the thin dies, because those punches get a little heavy when you lug them around to classes.
To finish off this tag, I stamped the #1 Mom stamp from Fiskars at the top of the tag and added another strip of the stamped paper to the top of the tag to cover the hole. You could now use this tag to decorate the cover of a long card that fits a #10 size long envelope, or just use the tag as is for your card. There is plenty of room on the back to write any message you like. Please visit me again this week for more ideas for Mother's Day cards, and don't forget to leave a comment on my blog to be eligible to win a chance at my Blog-aversary Prize Package to be given away May 12, 2013. See you again soon.
Thursday, April 25, 2013
Fiesta Time in Texas
Fiesta 2013 is coming to a close this weekend. Scheduled is the Battle of Flowers Parade, and the Fiesta Flambeau Parade, and several other events that are so much fun to attend.
My project for today is a tag, made with the julie Nutting Tag Pad from Prima and one of her Doll stamps; Doll with sleeveless dress. I stamped her on the tag with Tuxedo Black Memento ink and colored her in with my Copic Color Markers. I paper pieced her dress, also colored with Copics, and popped it up with foam tape so that I could add a colored lace border at the top and bottom of the dress. I also added a Prima rose at her waist, and several sticky pearls on her crown to embellish her attire.
I cut the letters of Fiesta from various colored card stock with the Folk Art Festival cartridge from Cricut, and backed each with a paper banner cut from the Firefly card stock 6" X 6" paper pad. I then adhered them to the right side of the tag and tied coordinating strips of grosgrain ribbon for bows at each end of the banner, and tied a white bias tape bow at the top of the tag for accent. To finish off the tag, I stamped dots of bright colored ink from my K & Co. Smash Book Ink Wand all over the tag to help it's colors tie in to the festive color scheme of the banner.
I want to thank you for stopping by my blog today. Be sure to check out the previous post for instructions on how to register for my Blog-aversary Prize Package that will be given away on or about May 12, 2013. I will see you again soon.
Mindy
My project for today is a tag, made with the julie Nutting Tag Pad from Prima and one of her Doll stamps; Doll with sleeveless dress. I stamped her on the tag with Tuxedo Black Memento ink and colored her in with my Copic Color Markers. I paper pieced her dress, also colored with Copics, and popped it up with foam tape so that I could add a colored lace border at the top and bottom of the dress. I also added a Prima rose at her waist, and several sticky pearls on her crown to embellish her attire.
I cut the letters of Fiesta from various colored card stock with the Folk Art Festival cartridge from Cricut, and backed each with a paper banner cut from the Firefly card stock 6" X 6" paper pad. I then adhered them to the right side of the tag and tied coordinating strips of grosgrain ribbon for bows at each end of the banner, and tied a white bias tape bow at the top of the tag for accent. To finish off the tag, I stamped dots of bright colored ink from my K & Co. Smash Book Ink Wand all over the tag to help it's colors tie in to the festive color scheme of the banner.
I want to thank you for stopping by my blog today. Be sure to check out the previous post for instructions on how to register for my Blog-aversary Prize Package that will be given away on or about May 12, 2013. I will see you again soon.
Mindy
Friday, April 12, 2013
Yipes! Stripes!
Yipes! Stripes! A horse in his striped pajamas! Today's card has been sitting on my desk for several weeks, with no special theme. I had these zebra striped cards from a box of animal print cards by Die Cuts with a View, yet had never used the zebra striped ones. I finally found a wonderful zebra stamp, and stamped it on a white kraft tag a month or so ago with Memento Tuxedo black ink. I used my copic markers to shade around the zebra stamp to give depth, and around the letters on the banner stamp "Bannerific" from Lawn Fawn. I also had a small black accent tag that I decided to use behind the zebra for more umpff! I cut around part of the zebra's body with my Xacto knife and made a pocket for the tag to fit in, before adhering the white tag to the front of the card. I then attached my "LOVE" banner below the white tag, and added a strip of numbered washi tape to the tag edge.
Although it doesn't show well in the photo, I adhered a black & red gingham check ribbon tied in a bow, to the small black tag before sticking it in the pocket. I haven't decided what to write on the black tag yet, it is for a dear friend who has a birthday coming up in the next week and a half. I will have to use my white gel pen to write a message on the black tag, so I will have to hunt down the white pen. (I always have trouble finding the white pen, I should buy several and leave them all around the house so I can find one when I need it.)
I didn't realize it had been so long since my last post. I was busy doing my taxes, and I guess they took longer than I expected. But thank goodness they are done now, and I can get back to my card making and art journaling. I would much rather work on art than taxes! I hope you all have a great weekend, and aren't stuck indoors doing YOUR taxes at the last minute. I will be stamping and having FUN! See you again soon.
Although it doesn't show well in the photo, I adhered a black & red gingham check ribbon tied in a bow, to the small black tag before sticking it in the pocket. I haven't decided what to write on the black tag yet, it is for a dear friend who has a birthday coming up in the next week and a half. I will have to use my white gel pen to write a message on the black tag, so I will have to hunt down the white pen. (I always have trouble finding the white pen, I should buy several and leave them all around the house so I can find one when I need it.)
I didn't realize it had been so long since my last post. I was busy doing my taxes, and I guess they took longer than I expected. But thank goodness they are done now, and I can get back to my card making and art journaling. I would much rather work on art than taxes! I hope you all have a great weekend, and aren't stuck indoors doing YOUR taxes at the last minute. I will be stamping and having FUN! See you again soon.
Thursday, March 28, 2013
LOVE-ly Lady Tag
Here's a special card for you, lovely lady!
Today's post is a tag/card made from the New Prima products I purchased from Paper Wishes/HOTP.
The tag is a large tag made by Prima, it's measurements are 3 3/4" x 8 1/2" and it is a heavy weight stock preprinted with an antique writing lightly in the background. They come in a pad of 48 tags for about $7.00. The back side is white, so you can decorate it also, or leave it plain for writing a special message. It then fits easily in a #10 business size envelope for mailing.
The tall Doll stamp, also from Prima, is designed by Julie Nutting. They are just labeled as Doll and then a number. The companies where I have seen them, have them numbered #1, #2, #3, and so forth, but not every company's numbers are the same, so you have to remember which one you saw where. There are two styles I have seen so far, a younger little girl, and the older looking tween or young woman. Then each doll has different poses and dresses. I stamped the doll on the tag with memento black ink and then colored it in with my copic markers. I didn't really like the way the dress looked when I finished, so I paper pieced a dress to pop on top with foam dots. That gave the image some dimension anyway. I then stamped and punched a few various flowers and leaves from stock and assembled them together to form the floral arrangement in the bottom left corner. I used Ranger Glossy Accents to glue the flowers together, and Liquid Pearls to dot the centers. The sentiment "love" was colored with copics and then heat embossed with Vintage Gold embossing powder from Globecraft & Piccolo, and adhered with Glossy Accents. To finish off, I tied a bow at the top with a thin brown plaid ribbon.
A handwritten message on the back, and then pop it into an envelope and off it goes to a dear friend who is celebrating a birthday this month. I hope you have enjoyed this tag, and hope you will check back in a few days for more stamping and paper fun. See you soon.
Today's post is a tag/card made from the New Prima products I purchased from Paper Wishes/HOTP.
The tag is a large tag made by Prima, it's measurements are 3 3/4" x 8 1/2" and it is a heavy weight stock preprinted with an antique writing lightly in the background. They come in a pad of 48 tags for about $7.00. The back side is white, so you can decorate it also, or leave it plain for writing a special message. It then fits easily in a #10 business size envelope for mailing.
The tall Doll stamp, also from Prima, is designed by Julie Nutting. They are just labeled as Doll and then a number. The companies where I have seen them, have them numbered #1, #2, #3, and so forth, but not every company's numbers are the same, so you have to remember which one you saw where. There are two styles I have seen so far, a younger little girl, and the older looking tween or young woman. Then each doll has different poses and dresses. I stamped the doll on the tag with memento black ink and then colored it in with my copic markers. I didn't really like the way the dress looked when I finished, so I paper pieced a dress to pop on top with foam dots. That gave the image some dimension anyway. I then stamped and punched a few various flowers and leaves from stock and assembled them together to form the floral arrangement in the bottom left corner. I used Ranger Glossy Accents to glue the flowers together, and Liquid Pearls to dot the centers. The sentiment "love" was colored with copics and then heat embossed with Vintage Gold embossing powder from Globecraft & Piccolo, and adhered with Glossy Accents. To finish off, I tied a bow at the top with a thin brown plaid ribbon.
A handwritten message on the back, and then pop it into an envelope and off it goes to a dear friend who is celebrating a birthday this month. I hope you have enjoyed this tag, and hope you will check back in a few days for more stamping and paper fun. See you soon.
Friday, December 7, 2012
Coloring Stamped Images with Inktense Pencils
Fellow Stampers,
Today I am coloring stamped images with the Inktense colored pencils from Derwent.
In the previous post, I mentioned using them to color the snowman on kraft colored card stock. These are stamped on white tags, and the color is even more intense. Using water to blend the colors, seems easier to me than blending with just regular colored pencils. Of course, I like coloring some images with my Prismacolor pencils because of their creamy smooth texture, but these just seem easier to blend, plus you get the intense color without building the many, many layers of color.
I have tried several different brands of watercolor pencils in my day, and I really believe these Inktense style, by Derwent, are the fastest and easiest to use when coloring stamped images. They are also said to give vivid color on fabric surfaces, but I haven't tried this medium yet. I have a canvas envelope that I plan on stamping today, so I may have a sample using them on fabric for you tomorrow.
Just like Copic markers are faster and easier to blend then other brands of markers, Inktense pencils are easier than other colored pencils. Of course, this is my opinion, try them out for yourself and see what you think before purchasing. Many small Mom & Pop owned art stores will let you try many products before you buy, whereas the larger chain stores will not. Even attending a class or a crop will expose you to new products that you can "try, before you buy." So while out shopping this holiday season, try "Shopping Small" with local merchants. You will learn more than you thought humanly possible, and even get a great deal to boot! You may even make a good friend in the process. Help support small business!
Today I am coloring stamped images with the Inktense colored pencils from Derwent.
In the previous post, I mentioned using them to color the snowman on kraft colored card stock. These are stamped on white tags, and the color is even more intense. Using water to blend the colors, seems easier to me than blending with just regular colored pencils. Of course, I like coloring some images with my Prismacolor pencils because of their creamy smooth texture, but these just seem easier to blend, plus you get the intense color without building the many, many layers of color.
I have tried several different brands of watercolor pencils in my day, and I really believe these Inktense style, by Derwent, are the fastest and easiest to use when coloring stamped images. They are also said to give vivid color on fabric surfaces, but I haven't tried this medium yet. I have a canvas envelope that I plan on stamping today, so I may have a sample using them on fabric for you tomorrow.
Just like Copic markers are faster and easier to blend then other brands of markers, Inktense pencils are easier than other colored pencils. Of course, this is my opinion, try them out for yourself and see what you think before purchasing. Many small Mom & Pop owned art stores will let you try many products before you buy, whereas the larger chain stores will not. Even attending a class or a crop will expose you to new products that you can "try, before you buy." So while out shopping this holiday season, try "Shopping Small" with local merchants. You will learn more than you thought humanly possible, and even get a great deal to boot! You may even make a good friend in the process. Help support small business!
Subscribe to:
Posts (Atom)