Friday, January 30, 2015

My Back Yard


Greetings friends! Mindy with you today sharing a card that reminds me of  things happening in my back yard. I was going through my collection of thin metal dies, and as I picked out a few that I thought would go together, I realized that they were things that are in my back yard right now!

I started my card with some card stock and scrap paper that were on my desk from a previous card making session. I then began building layers of die cuts representing the items in my back yard.  Using the Fancy Floral Butterfly Corner from Cottage Cutz, I cut two, one for each offset corner. I have lots of plants and flowers that attract butterflies in my yard, along with birdhouses of all shapes and sizes. Using the Birdhouse Die Cut set from Impression Obsession, I die cut the three houses to place on my card, along with two die cut birds that I adhered with Joy! Foam Pads - small to give the birds depth and dimension.

I also have lots of squirrels in my yard, so using the Squirrel Set die from Impression Obsession I cut two squirrels and adhered one on the ground and the other hanging from the dangling birdhouse that hangs from the tree in my back yard.  Using my Wink of Stella- clear glitter pen I highlighted some of the butterflies and flowers on the corners. To complete my card, I added a satin bow and tag to the tallest birdhouse, and my Backyard Card was complete.

I hope you all have a great day creating something NEW from supplies found in the Classy Cards n' Such Online Store.  And don't forget to add the coupon code MINDY-10 at checkout to receive a 10% discount on your complete order.

Wednesday, January 28, 2015

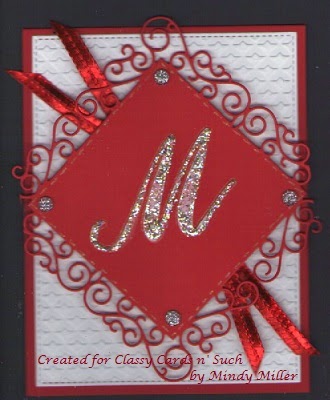
Monogram


Hello, Mindy with you today with my take on the Letter It Challenge this week at Classy Cards n' Such.  Our task this week is to use a letter or letters, so I decided to feature my monogram.

I began my card with a white card stock background cut with the Blueprints 13 Die-namics stitched background die from My Favorite Things. I then ran it through the Lattice Embossing Folder from Craft's Too! to give it some texture.  The next layer was die cut with the Claudette Frame by Poppy Stamps in cherry red card stock. I centered my monogram letter stencil on the frame, turned point-on, and spread it with Dreamweaver Regular Embossing Paste using my Flat Palette Knife.  While the paste was still wet, I sprinkled on some loose glitter to give a little twinkle to the front of my card. I then added some Clear Rock Candy by Queen and Company to the corners of  the frame.

Before adhering the frame to my card front with Large Foam Pads from Joy! Crafts, I attached tails of ribbon on opposite corners.  I hope you have enjoyed my card and will create one as your entry into our weekly challenge.


Saturday, January 24, 2015

A Beautiful Day


A Beautiful day is what you will have if you send or receive a handmade greeting card like this one.
Hello friends, Mindy here, sharing a card made with a brand New stamp set in the Classy Cards n' Such Online Store.

The name of the stamp set used is Christmas Joy by Sweet and Sassy Stamps, and features a beautiful Cardinal bird image. I stamped the bird on white card stock and colored it with colored pencils. I then used a Scalloped edge circle die from Spellbinders to cut a circle from Super Gold Metallic paper for backing.  I cut an A2 size card base from the gorgeous Amethyst Stardream Metallic paper, and then using some of the bright Gold Mirricard cut a large fishtail banner using the Blueprints 13 Die-namics set by My Favorite Things. I mounted the banner first on the card base, and then the image element, popped up on Foam Pads-large from Joy!

The sentiment is from the Birds and Roses set, also from Sweet and Sassy Stamps. To complete my card, I attached a silk flower and two leaves from my flower stash.  I hope you have a wonderful, and beautiful day, and make a resolution to create more cards in 2015.

Wednesday, January 21, 2015

Brighten the Way


Greetings friends, Mindy with you today to share my card sample for the Winter Birds Challenge #68 at Classy Cards n' Such.  My card is titled Brighten the Way, and features a winter-like background with two beautiful Cardinals, one male, one female.


I started with two embossing folders, Lattice by Crafts Too! and Swirl Frame by Nellie Snellen and embossed a sheet of white card stock with each one. I then trimmed around the Swirl Frame and cut out the oval opening, and glittered around the opening for a little bling. I then die cut two of the Cardinal- Right Facing bird dies from Dee's Distinctively and one of the Branch Set 1 also from Dee's Distinctively. I cut one bird from red card stock, and one from kraft colored stock. The branch was cut from kraft colored stock also, and I used a marker to give it brown grain lines to look like a branch. I brushed on some Light Molding Paste to look like snow on the branch, but you could also use Dreamweaver Regular White Embossing Paste for the look of snow. I also added a bit of glitter to the branch to give it some winter sparkle.

I colored the female cardinal with some Distressed Markers from Ranger and used my Tim Holtz Water Brush by Ranger to blend the colors on the wings, tail, and topknot feathers. I used Foam Pads- Large by Joy! Crafts to adhere the birds to the card front.  The sentiment used was from the stamp set Flowers in Bloom by Sweet and Sassy Stamps, and was stamped on white card stock backed with Silver Mirror card stock.  To complete the card, I adhered a strip of ribbon trim down the fold to add a bit of color and shine.

I hope you have enjoyed my Winter Birds, and will join our challenge this week with some of your own. Happy Stamping!

Saturday, January 17, 2015

Each Little Flower


Each Little Flower that opens . . . the Lord God made them all. Such a beautiful verse that is included with the floral stamp I used on this card. Hello friends, Mindy with you today, sharing a card that is perfect when thinking of a special friend.

I started by stamping the floral image, Flowers in Bloom by Sweet and Sassy Stamps on a rectangle of white card stock. I then used my Copic Alcohol markers to color the flowers, stems, and butterfly, blending several colors as I went. The verse from the stamp set was then stamped to the right of the flowers.  I then die cut the Country Fence by Poppystamps from Echo Bronze Stardream metallic card stock, and the phrase Thinking of You, using the die Greeting Set by Impression Obsession from some of the Stardream Fuse Azalea metallic paper.

After adhering the fence and phrase using clear glue, I matted the white card with a rectangle of the darker Stardream Punch metallic paper to the bright yellow card base.

I hope you have enjoyed this card, and that it has inspired you to send a special friend a card you make yourself with supplies from Classy Cards n' Such Online Store.  Remember to add the coupon code: MINDY-10 to the box on the check out page to receive a 10% discount on your complete order.

Wednesday, January 14, 2015

Welcome Baby


Welcome Friends to Classy Cards Challenge #67, the color Pink and Polka Dots. Mindy here to share a lovely pink baby announcement with you today, that features the color Pink for a girl, and lots of fun dots, too!

I started this card with a very subtle background of butterfly shadows and pretty pastel colors. I cut one of the Woodland Tree Silhouette die from Memory Box and adhered it to the subtle background.  I then cut the Baby Carriage and Baby Clothes, both dies also from Memory Box, from some pink dotted paper.  The Baby Clothes Line die was paper pieced with a bit of each printed paper to give the onesies a bit of dimension.

I decorated the Baby Carriage with satin ribbon loops and a bow, and a tag that announced the baby girl.  I used Joy! Foam Pads- large to attach the carriage to the card front before adding offset corners cut from a Spellbinder's die, A2 Divine Eloquence.  The last touch of whimsy came when I added polka dots to the background paper, using a pencil eraser and Neon Pink Hero Arts ink.

Thanks for visiting, and have a Happy Stamping Day!

Saturday, January 10, 2015

Painted Roses


A Rose is a Rose, so the poets say, Thinking of You on this special day! Mindy here, with a Rosy card suitable for many occasions, Get Well, Birthday, or Thinking of You.

I started with a sheet of the beautiful So . . . Silk Beauty Pink card stock sold in the Classy Cards n' Such Online Store for my card base.  If you haven't ordered any of this card stock, please do!  The texture and feel of this card is amazing, and so wonderful to work with. I then took a rectangle of pale pink card stock and embossed it with the Rose Pavilion Embossing Folder by Anna Griffin.  Using my craft knife I cut around the inside of the design, removing the center to use as a separate piece.  I then trimmed closely around the flower image and highlighted the flowers with a Wink of Stella Clear Glitter Pen. This helped to tint the flowers just a bit and make them stand out from the rest of the background.

I then added a sentiment with the Greeting Set die by Impression Obsession and a few Sleek Strip Pearls- Le Creme from Want2Scrap. These pearls come with two sizes in each pack, so I scattered some of both sizes on my card. The background and focal image were both adhered with Foam Pads -Large by Joy! Crafts to give the card depth and dimension.

I want to thank you for joining me today and sharing this very simple, but elegant, card.

Tuesday, January 6, 2015

Let it Snow


Wonderful wintry wishes, this first week of a New Year, 2015!  Mindy with you today, to share my card for this weeks challenge at Classy Cards n' Such, the color Teal, and snowflakes!

I started by making a watercolor background, using a green and a blue Gelato pigment crayon from Faber Castell to lay down the sky colors then blend with my finger and a moist baby wipe.  Then using the Small Snowflake die set from Impression Obsession and Pearlized Esse White Metallic card stock, I die cut two sets of the snowflakes and adhered them to the wintry background. Some  I adhered directly to the background, and some I popped up, using Foam Pads small from Joy! to give the card dimension. I also tore two strips of the white metallic paper to look like a snow bank and snow on the ground. I also used a white Sharpie marker to make small dots in the background to look like snow falling.

I then die cut the Carolers from Impression Obsession using So . . .Silk Glamour Green card stock. I placed them on top of the snow bank with foam pads, then using my own handwriting wrote Let it Snow. . . Let it Snow. . . Let it Snow along the bottom of the card.

To add a little bling to the card, I adhered some stones from the Sleek Silver Rhinestone Strips from Want2Scrap to each snowflake, and highlighted the entire card with my Clear Glitter Pen from Wink of Stella. Now sing along; "Oh the weather outside is frightful. . . . . "

Saturday, January 3, 2015

Bluebird Blessings


Mindy here, with you today sharing a Thinking of You card that can be used any time of the year.

I started by stamping the Birds and Roses stamp from Sweet and Sassy Stamps on white card stock and coloring it in with my Pitt Pens from Faber-Castell. The reason I used the Pitt Pens is they have a very fine point that gets into the tiniest of places when coloring an image. I also stamped the phrase from the same stamp set, Blessings to You on white stock and decorated the edges of it with the same Pitt Pens.  I also die cut the design with the S4- Standard Circles Die- Lg. from Spellbinders.  If you are in need of a Spellbinders die that is not carried in the Classy Cards n' Such Online Store, please email Beverly and she will see about getting it for you.  After I cut the circle, I backed it with a scrap of printed paper that I cut with a Scalloped Circle die. The tag for the sentiment was cut from the Romantic Rectangles die also from Spellbinders.

I then began working with the background of the card.  The base of the card is made from Stardream Fuse Azalea Metallic paper cut to an A 2 size card.  I then had several pieces left over from a previous card made, so I pieced a background like a mosaic. The various pieces were embossed with the Lattice embossing Folder, and Vintage Flowers Embossing Folder both from Crafts Too! I adhered them with double-stick ScorTape to the card front positioning and trimming them to fit the 4" X 5.25" size.  I then attached the image and sentiment with Foam Pads- Lg. to give the card depth and dimension.

I hope you have enjoyed my card, and that you will participate in our Weekly Card Challenges.  They begin on Sundays, with a new theme each week. Be sure to check the link in the right hand margin for more information.  Have a Great Day!

Thursday, January 1, 2015

Abstract Birthday


Hello friends, Mindy here, sharing a card for a masculine birthday with you today.  I have trouble making cards for gentlemen, whether they are family or friends.  I think it is all in my mind, but I am hesitant to begin designing them whenever a birthday is near.  I hope you will enjoy this card, and check out all of the New merchandise available at the Classy Cards n' Such Online Store.

I started by making my A 2 size card base from a half sheet of the amazing So . . . Silk Glamour Green card stock. This paper is so beautiful, and makes such a wonderful card base.  I then looked through my stash of mono and multi-print papers that I pulled from my Gelli Plate by Gelli Arts. I love making this printed paper in my spare time, when not designing cards.  I trim down my pages to fit the A 2 size card so they are ready to use when I want to make a card or project.  I then took a coordinating sheet from the Foil Paper- Textured Patterns 1 paper pack, and cut several squares and rectangles from it.

After adhering these shapes in a pleasing pattern I cut a sheet of the gold, from the same pack, with the Flower Vine die cut from Anna Griffin. I cut this design apart in three pieces and adhered them to the card front. To complete this card, I attached a square of the textured paper with Foam Pads- large from Joy! to add some depth and dimension, and a birthday greeting from the Greeting Set die from Impression Obsession.

I hope you have a wonderful day, full of blessings.

Happy New Year 2015!

HAPPY NEW YEAR 2015!

Happy New Year to All my Followers and Friends of Paper and Ink with Mulberry Mindy!

I wanted to take this time to thank you for your support this past year, and to invite you to join me in 2015 for another year of creativeness and experimentation in various mixed-media  projects and mediums. 

I will be continuing with my design team duties at Classy Cards n' Such, and hope to continue showcasing my love of other Paper Arts, including works in my Art Journals, Gelli Monoprinting, and Collage Art.

Come join me in my Art Adventures!
Mindy