Wednesday, August 12, 2015

Prayer Garden


Hello Friends! Mindy with you, featuring my thoughts on our inspiration photo presented for our weekly challenge at Classy Cards 'n Such.  Our Photo inspiration is a cute bunny munching on some greenery in the vintage garden.


When I studied this photo, I was inspired by the plants and the bunny's form, against the brick wall. I started my card with the Bricks and Bark Embossing Folder by Spellbinders against my card base.  I then die cut Garden Pots by Memory Box, Bunny Set and Grass Border by Impression Obsession,
a Leaf Branch by Sue Wilson, and two Small Hydrangea Blooms by Poppy Stamps.

I die cut the Bunny Set, and used it as a stencil to stipple the bunny shapes on to white card stock with green ink.  I was going for the topiary look, growing from the clay pots. I then hid the clay pots behind two layers of the Grass Border, also shaded with the green ink.  I used Joy! Foam Pads- Large to pop the topiary up against the brick wall to give the card dimension. I then added the Sue Wilson leaves and a Grommet Tag from Spellbinders to the top of my card, with a sentiment from the Keep in Touch, Too stamp from Sweet 'n Sassy Stamps.  Two small hydrangea blooms were die cut and added to the side of the grommet tag.

I hope you have enjoyed my card today, and are inspired by our photo to create a card of your own for our weekly challenge.

Thursday, August 6, 2015

It's Your Day!


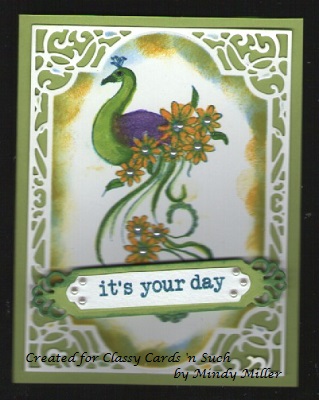
Celebrate good times!  Mindy, with a card celebrating one of my favorite collections from Heartfelt Creations, The Peacocks, available in the Classy Cards 'n Such Store!  I hope you will enjoy it, and want to make one for yourself.

I started by stamping the peacock and daisy figure from the Peacock Swirls stamp set on white card stock, and colored it with watercolor markers.  When I finished coloring the image, I die cut around it with the largest die from the A2 Divine Eloquence dies by Spellbinders. I centered the image on the card base, and added shadow around the image with Distress Ink Markers in several blue, green and yellow colors. I then adhered it to the card front, and added the banner, also cut from the Divine Eloquence die set.

To complete the card, I added a few small Baby Pearls- White to the sentiment tag and the daisy centers.  The sentiment is from the Keep in Touch, Too stamp set from Sweet 'n Sassy Stamps.
And there you have it!  A very elegant card that didn't take too many supplies, and not a lot of time to complete.  Happy Stamping! and I hope to visit with you all again soon.

Wednesday, August 5, 2015

Fragrant Flowers


Flowers leave some of their fragrance in the hand that bestows them!  Greetings, friends, Mindy here with this week's card for the weekly challenge at Classy Cards 'n Such.  The theme this week is to use embossing folders  to give your card texture. I love embossing folders, and usually use at least one on each card I make.  On this card though, I went a little crazy using FIVE different design folders to give my card texture.


I started by preparing my background for the front of my card.  I used the Stripe Folder by Darice to emboss the yellow top, and the Bricks and Bark by Spellbinders for the green base.  A coordinating ribbon was then added where the two came together to cover the joining.  I then stamped the Delightful Daisy stamp from Heartfelt Creations twice on watercolor paper, and then colored the daisies and leaves with my Color Bursts from Ken Oliver Crafts.  When the watercolors were dry, I cut out the petals with the  coordinated Delightful Daisy Dies, also by Heartfelt Creations.

I then embossed the violet daisy petals with the Lattice Embossing Folder by Crafts, Too! and the yellow/orange daisies with the reinforcement rings folder by Cuttlebug from my stash.  The leaves were embossed with the Dots Folder from Crafts Too! before being glued to the card front with Dries Clear Adhesive from the Art Institute. I then gently shaped each daisy petal with the Paper Blossom Tool Kit, being careful to not erase the designs from the embossing folders.

To complete my card, I stamped a phrase from the Iris stamp set by Our Daily Bread Designs, and adhered it to the front with foam tape. I tied a loop bow from ribbon in my stash, and tiny knots for the centers of each of the larger flowers.

I hope you have enjoyed looking at my card, and hope you will be inspired to submit a card of your own to our challenge.

Thursday, July 30, 2015

Butterfly Collage


I love butterflies, but I think I have mentioned that before.  Mindy with you today with another Butterflies are Free card, celebrating the many butterflies available with the Butterfly Medley stamps and dies from Heartfelt Creations.

I started by stamping the Butterfly Medley stamp Set on card stock and coloring them in with various colors of Distress Markers by Tim Holtz, and then die cutting them with the Butterfly Medley die set also from Heartfelt Creations.  I then used the two larger butterfly dies also included in the die set, and cut three butterflies from watercolor paper that was colored with Ken Oliver Color Bursts pigments.

I then arranged my collage of butterflies on my card front and adhered them with Art Institute Dries Clear Adhesive and Joy! Foam Pads- Large, alternating adhesives to give my card front depth and dimension.  A few Teardrop Bling Pearls were added, along with a banner and saying from my stash, and my card was complete.

Thanks for visiting with me today, I hope you have a wonderful weekend!

Wednesday, July 29, 2015

Daisy Birthday


Happy Wednesday friends.  Mindy visiting with you today, with my card for this week's challenge at Classy Cards 'n Such.  My card, Daisy Birthday, is inspired by the beautiful colors included in this week's inspiration photo on the Blog.  The challenge, using Color and Pattern, is a fairly simple concept to achieve.  I hope you will all create a card for this challenge and submit it for a chance at a wonderful prize.

Now on with my submission!  I started by making a patterned background with the Cascading Ferns Background stamp by JustRite Stampers on my card base. I then die cut the elegant scroll background with the Fleur de Elegance die from Spellbinders and adhered it to the card base with Joy! Foam Pads- Large.

Next, I stamped the Daisies stamp set from Stacy Stamps  on watercolor paper, both the single flower and the background flowers.  I colored the blooms with Distressed Ink Markers-from Tim Holtz in both Peeled Paint and Spiced Marmalade.  I cut the background stamp in an oval, and fussy cut the single daisy so that I could pop it up with the foam tape.  A birthday banner stamp from my stash was used to finish my card.

I hope you have enjoyed my creation, and will join us in our weekly challenge fun!

Thursday, July 23, 2015

Wish on a STAR-fish


Happy Summer everyone! Mindy here, wishing you a Happy Birthday if you celebrate during the months of June, July, and August!  Our challenge this week on our blog was to make a card with the theme "At the Beach". I had some shells left over from that card, and decided to use them for a birthday celebration card for a dear friend.


I started with a sand colored card base and added some "beachy" colored paper for the background.
From the Graphic 45 paper pad, By the Sea I found the embellishment card that said, "make a
wish on a starfish" and several coordinating ribbon strips that I could add to the card front.  I then decorated several of the shells from the Shell Set by Impression Obsession, especially the starfish and two others with a bit of glitter to make them sparkle and attached them with Joy! Foam Squares-Large.

I stamped a banner with the sentiment from the Keep in Touch, Too stamp set, and tied a twine bow to the banner to complete my card.

I hope you have enjoyed my card, and will join us for our challenge this week. Be sure to check the requirements on the Challenge Page before submitting your card.  We love to see what you create!

Wednesday, July 22, 2015

Beach Rules


Oh, I wish I were at the beach!  Mindy posting today wishing I was at the beach with the sand squishing up between my toes. I love the beach, and from where I live, it is only three hours away.  Our challenge this week at Classy Cards 'n Such is "At the Beach" and I hope you will join in and create a card that celebrates the wildlife, shells, anything that pertains to the beach. . . . but NO people allowed!

My card features a wreath die-cut from the Impression Obsession die Twig Wreath from natural card stock.  I then used the Shell Set also from IO to cut the various shells and decorate each one with Distresses Inks and a little glitter. I positioned each shell on the wreath with Joy! Foam Pads -Large, and Art Institute Dries Clear Adhesive.

I then decorated the card base with a piece of scrapbook paper from my stash,  before adhering two elements from the Graphic 45 paper pad By The Sea. My wreath was then attached with foam tape, and a string bow added at the base of the wreath.

Thank you for visiting, I hope you have enjoyed my card.